MySQLでデータベースサーバーを作り、リレーショナルデータベースを味わいます。
このデータベースは OSS出身で、サンマイクロシステムズに買われてから、Oracleがサンマイクロシステムズを買ったので、現在は 世界有数のデータベース商品を抱える Oracle社のプロダクトということになります。
サンマイクロシステムズが Oracleに買われたことで MySQLの存続も危ぶまれましたが、現在では MySQL独自の進化を続けながら 1つの会社の中で Oracle Databaseとの共存しています。
OSSの DBとしては、PostgreSQLと人気を二分していますが、AWSでも Azureでも MySQLの DaaSがあることもあり、しばらく無くなることはないと思います。
依然として人気の高いデータベースです。
本家サイトはこちらです。
MySQL
2024年4月末に久しぶりに LTS(Long Term Support)版の最新版である 8.4 が出ました。
今後しばらくはこのバージョンが MySQLの基幹バージョンになるのでしょう。
では早速インストールしてみましょう。
1.環境
以下の構成でいきます。
- Ubuntu Server 24.04
- MySQL 8.4
2.Ubuntuの MySQLパッケージ調査
Ubuntu 24.04の snapと aptのリポジトリには MySQLがあるのか、まず確認してみます。
snapのほう。
subro@UbuntuServer2404-1:~$ snap info mysql
name:      mysql
summary:   Experimental MySQL Community snap
publisher: Canonical Data Platform (dataplatformbot)
store-url: https://snapcraft.io/mysql
contact:   lars.tangvald@oracle.com
license:   GPL-2.0
description: |
  MySQL Snap Contains the minimal set of binaries needed for the MySQL server and client. This is
  meant as a way to try out MySQL with Snappy, and is not to be considered ready for production
  environments. Before running, the process control interface must be connected with the command
  «snap connect mysql:process-control»
snap-id: YNxM22tkUrmu4YHhBt9PShBj7DwKojxp
channels:
  latest/stable:    –
  latest/candidate: –
  latest/beta:      5.7.17    2017-05-17 (3) 17MB -
  latest/edge:      8.0.0-dmr 2017-05-17 (4) 18MB -
  8.0/stable:       –
  8.0/candidate:    –
  8.0/beta:         8.0.0-dmr 2017-05-17 (4) 18MB -
  8.0/edge:         ↑
  5.7/stable:       –
  5.7/candidate:    –
  5.7/beta:         5.7.17    2017-05-17 (3) 17MB -
  5.7/edge:         ↑
MySQLはありますけど、まだ前の LTSの 8.0 で、かつ stableではなく betaのチャンネルのもののようです。
aptのほう。
subro@UbuntuServer2404-1:~$ apt search mysql
〜〜〜 省略 〜〜〜
mysql-server/noble-updates,noble-security 8.0.40-0ubuntu0.24.04.1 all
  MySQL database server (metapackage depending on the latest version)
〜〜〜 省略 〜〜〜
こちらも 8.0 でした。
snapパッケージの様子では Ubuntuを作っている Canonicalは MySQLについてはパッケージを綺麗に揃えようって考えてないようです。
MySQLの販売元である Oracle社との関連やライセンスが関係しているのかも知れません。
ここでは 8.4 を味わいたいので、他の方法を考えます。
3.MySQLのリポジトリを登録する
Canonicalにやる気が感じられませんので、MySQLのリポジトリから取得する方針にします。
ダウンロードはこちらから。
MySQL Community Downloads
上のリンク先に行くと deb形式のパッケージファイルを含むインストール用のバイナリファイルやら何やらをダウンロードできるんですが、2024年12月8日時点では LTSではないリリースである 9.1がデフォルトでえらばれていますので、ここでの対象環境に併せて以下の通り選びます。
| Select Version: | 8.4.3LTS |
| Select Operating System: | Ubuntu Linux |
| Select OS Version: | Ubuntu Linux 24.04 (x86, 64-bit) |
しますと [Install Using APT:: にペンギンの絵が出てきますので、それをクリックします。
画面が変わって [Ubuntu / Debian (Architecture Independent), DEB Package] というのが選ばれていますので、Downloadを押します。
このダウンロードには Oracleのアカウントが必要で、アカウント/パスワードの入力画面になります。
Oracleのアカウントを持っていない人は無料で作れます。
もし Oracle Databaseや MySQLをこれからやっていこうと思う人は作っておいたほうが良いと思います。
(私は Javaの資格を取るときも使いましたので)
Oracleのサイトへのログインが済むと、やっと本当のダウンロードページに遷移しますのでDownload Now >>を押します。
ダウンロードが完了すると [mysql-apt-config_0.8.33-1_all.deb]ファイルができました。
後で分かりますけど、このファイルは MySQLの本体ではなく、MySQLの aptリポジトリを登録するためのものです。
私は クライアントPCとして使っている Lubuntuの Firefoxでダウンロードしたので、scpコマンドで Ubuntu Serverに持っていきました。
Ubuntu Serverでパッケージを実行して MySQLのリポジトリを OSに登録します。
subro@UbuntuServer2404-1:~$ sudo apt install -y ./mysql-apt-config_0.8.33-1_all.deb
〜〜〜 省略 〜〜〜
バージョンによっていリポジトリの URLが違うんでしょうね。
この画面になって選択するリポジトリのカスタマイズができるようになっていますが、8.4 を入れるには何も変えずに ↓キーで [Ok] を選択し、Enterキーを押します。
MySQLの aptリポジトリの OSへの登録は [/etc/apt/sources.list.d/mysql.list]ファイルが実体です。
内容はこうなっていて、8.4が対象になっているのが分かります。
### THIS FILE IS AUTOMATICALLY CONFIGURED ###
# You may comment out entries below, but any other modifications may be lost.
# Use command 'dpkg-reconfigure mysql-apt-config' as root for modifications.
deb [signed-by=/usr/share/keyrings/mysql-apt-config.gpg] http://repo.mysql.com/apt/ubuntu/ noble mysql-apt-config
deb [signed-by=/usr/share/keyrings/mysql-apt-config.gpg] http://repo.mysql.com/apt/ubuntu/ noble mysql-8.4-lts
deb [signed-by=/usr/share/keyrings/mysql-apt-config.gpg] http://repo.mysql.com/apt/ubuntu/ noble mysql-tools
deb-src [signed-by=/usr/share/keyrings/mysql-apt-config.gpg] http://repo.mysql.com/apt/ubuntu/ noble mysql-8.4-lts
新規リポジトリが追加されましたので、パッケージ情報を取得します。
subro@UbuntuServer2404-1:~$ sudo apt update
取得:1 http://repo.mysql.com/apt/ubuntu noble InRelease [22.7 kB]
取得:2 http://security.ubuntu.com/ubuntu noble-security InRelease [126 kB]
取得:3 http://repo.mysql.com/apt/ubuntu noble/mysql-8.4-lts Sources [967 B]
ヒット:4 http://jp.archive.ubuntu.com/ubuntu noble InRelease
取得:5 http://jp.archive.ubuntu.com/ubuntu noble-updates InRelease [126 kB]
取得:6 http://repo.mysql.com/apt/ubuntu noble/mysql-8.4-lts amd64 Packages [12.6 kB]
取得:7 http://security.ubuntu.com/ubuntu noble-security/main amd64 Components [7,180 B]
取得:8 http://security.ubuntu.com/ubuntu noble-security/restricted amd64 Components [212 B]
取得:9 http://security.ubuntu.com/ubuntu noble-security/universe amd64 Components [51.9 kB]
取得:10 http://security.ubuntu.com/ubuntu noble-security/multiverse amd64 Components [208 B]
取得:11 http://repo.mysql.com/apt/ubuntu noble/mysql-tools amd64 Packages [4,194 B]
取得:12 http://jp.archive.ubuntu.com/ubuntu noble-backports InRelease [126 kB]
取得:13 http://jp.archive.ubuntu.com/ubuntu noble-updates/main amd64 Components [132 kB]
取得:14 http://jp.archive.ubuntu.com/ubuntu noble-updates/restricted amd64 Components [212 B]
取得:15 http://jp.archive.ubuntu.com/ubuntu noble-updates/universe amd64 Components [309 kB]
取得:16 http://jp.archive.ubuntu.com/ubuntu noble-updates/multiverse amd64 Components [940 B]
取得:17 http://jp.archive.ubuntu.com/ubuntu noble-backports/main amd64 Components [208 B]
取得:18 http://jp.archive.ubuntu.com/ubuntu noble-backports/restricted amd64 Components [212 B]
取得:19 http://jp.archive.ubuntu.com/ubuntu noble-backports/universe amd64 Components [11.7 kB]
取得:20 http://jp.archive.ubuntu.com/ubuntu noble-backports/multiverse amd64 Components [212 B]
933 kB を 4秒 で取得しました (229 kB/s)
パッケージリストを読み込んでいます... 完了
依存関係ツリーを作成しています... 完了
状態情報を読み取っています... 完了
アップグレードできるパッケージが 2 個あります。表示するには 'apt list --upgradable' を実行してください。
これで MySQLリポジトリの登録は OKです。
4.インストール
改めて MySQLのパッケージを調べます。
subro@UbuntuServer2404-1:~$ sudo apt search mysql
mysql-community-client/不明 8.4.3-1ubuntu24.04 amd64
  MySQL Client

mysql-community-server/不明 8.4.3-1ubuntu24.04 amd64
  MySQL Server

mysql-shell/不明 8.4.3-1ubuntu24.04 amd64
  MySQL Shell (part of MySQL Server) 8.0
一杯出てきますが「これがインストール対象だろう」ってものだけ書いて他は省略しています。
MySQL Shellは馴染みのない方もいらっしゃると思いますが、Oracle社は従来の mysqlコマンドよりこちらに移行したそうなので、これも入れておいた方が良いでしょう。
上の 3つのパッケージをインストールします。
subro@UbuntuServer2404-1:~$ sudo apt -y install mysql-community-server mysql-community-client mysql-shell
〜〜〜 いっぱい出るので省略 〜〜〜
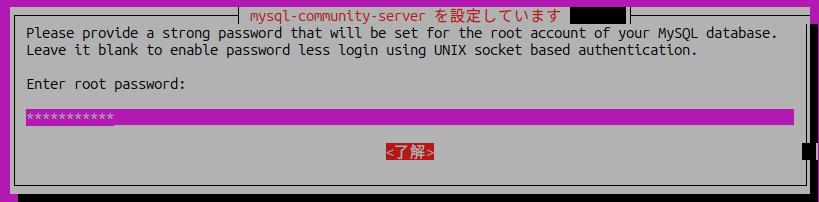
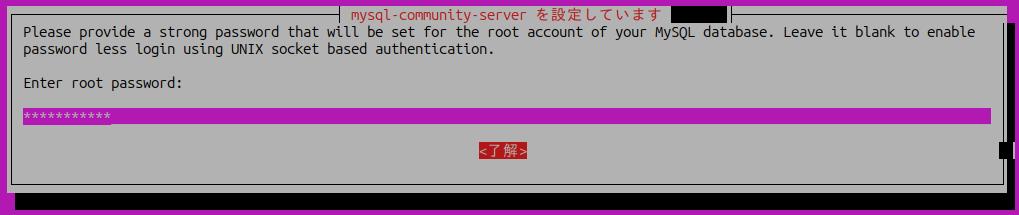
途中でこのように MySQLの [root]ユーザーの初期パスワード設定を促されます。
8.0の頃はこれは無かった気がします。
結構強いパスワードを設定し、TABキーを押して [<了解>] を選択し、Enterキーを押します。
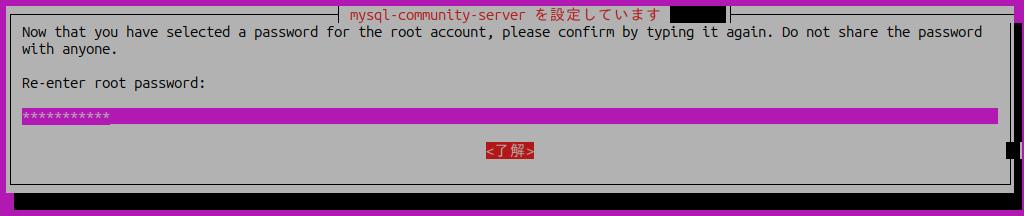
もう一回確認のためにパスワード入力を促されますので、同様に処理してください。
しばらくしてインストールを完了できました。
5.初期化
MySQLの初期化という作業をします。
主にセキュリティ関連の初期セッティングになります。
ここからは OSのユーザーと MySQLのユーザーを混同しないように気をつけて下さい。
subro@UbuntuServer2404-1:~$ sudo mysql_secure_installation

Securing the MySQL server deployment.

Enter password for user root:**********  ← インストール時に設定したMySQLの[root]ユーザーのパスワード

VALIDATE PASSWORD COMPONENT can be used to test passwords
and improve security. It checks the strength of password
and allows the users to set only those passwords which are
secure enough. Would you like to setup VALIDATE PASSWORD component?

十分にセキュアなパスワードになっているかをチェックする VALIDATE PASSWORD を設定するか聞いています。
Press y|Y for Yes, any other key for No: y

3段階種類あるパスワード強度から選ぶように聞いています。
There are three levels of password validation policy:

LOW    Length >= 8
MEDIUM Length >= 8, numeric, mixed case, and special characters
STRONG Length >= 8, numeric, mixed case, special characters and dictionary                  file

Please enter 0 = LOW, 1 = MEDIUM and 2 = STRONG: 0  ← 検証ではタルいので[LOW]にしました。
Using existing password for root.

Estimated strength of the password: 100   ← MySQLの[root]ユーザーのパスワード強度が100のようです。(多分100が最高)
MySQLの[root]ユーザーのパスワードを変えるか聞いています。
Change the password for root ? ((Press y|Y for Yes, any other key for No) : n

 ... skipping.

デフォルトで作られている匿名ユーザーを削除するか聞いています。
By default, a MySQL installation has an anonymous user,
allowing anyone to log into MySQL without having to have
a user account created for them. This is intended only for
testing, and to make the installation go a bit smoother.
You should remove them before moving into a production
environment.

Remove anonymous users? (Press y|Y for Yes, any other key for No) : y
Success.

リモートノードからMySQLの[root]ユーザーでのアクセスを拒否するか聞いています。
Normally, root should only be allowed to connect from
'localhost'. This ensures that someone cannot guess at
the root password from the network.

Disallow root login remotely? (Press y|Y for Yes, any other key for No) : y
Success.

インストール時のデフォルトで作られる[test]データベースを消すか聞いています。
By default, MySQL comes with a database named 'test' that
anyone can access. This is also intended only for testing,
and should be removed before moving into a production
environment.


Remove test database and access to it? (Press y|Y for Yes, any other key for No) : y
Success.

  - Dropping test database...
Success.

 - Removing privileges on test database...
Success.

一通り変えた権限設定を今反映するか聞いています。
Reloading the privilege tables will ensure that all changes
made so far will take effect immediately.

Reload privilege tables now? (Press y|Y for Yes, any other key for No) : y
Success.

All done!
初期化が完了しました。
これで環境構築が完了しました。
6.データベース作成
[subrotest]データベースを作ります。
MySQLの [root]ユーザーでログインします。
subro@UbuntuServer2404-1:~$ mysql -u root -p
Enter password: MySQLの[root]ユーザーのパスワードを入れる
Welcome to the MySQL monitor.  Commands end with ; or \g.
Your MySQL connection id is 10
Server version: 8.4.3 MySQL Community Server - GPL

Copyright (c) 2000, 2024, Oracle and/or its affiliates.

Oracle is a registered trademark of Oracle Corporation and/or its
affiliates. Other names may be trademarks of their respective
owners.

Type 'help;' or '\h' for help. Type '\c' to clear the current input statement.

mysql>
ログインできました。
「mysql> 」が MySQLのコマンドプロンプトで、SQL文を入れたりする所になります。
既に存在しているデータベースを一覧してみます。
mysql> show databases;
+--------------------+
| Database           |
+--------------------+
| information_schema |
| mysql              |
| performance_schema |
| sys                |
+--------------------+
4 rows in set (0.00 sec)
システム用のデータベースしかありません。
[subrotest]データベースを作成します。
mysql> create database subrotest;
Query OK, 1 row affected (0.01 sec)
データベースができました。
データベース一覧を表示します。
mysql> show databases;
+--------------------+
| Database           |
+--------------------+
| information_schema |
| mysql              |
| performance_schema |
| subrotest          | ← できました。
| sys                |
+--------------------+
5 rows in set (0.00 sec)
[subrotest]データベースができましたので、この中に [subrotesttable]テーブルを作ります。
使用するデータベースを選択します。
mysql> use subrotest;
Database changed
[subrotest]データベースを選択できました。
[subrotesttable]テーブルを作ります。
mysql> create table subrotesttable ( name char(50) );
Query OK, 0 rows affected (0.01 sec)
固定長 50文字の [name]カラムを持たせました。
データを挿入してみましょう。
mysql> insert into subrotesttable values('Tanaka');
Query OK, 1 row affected (0.01 sec)

mysql> select * from subrotesttable;
+--------+
| name   |
+--------+
| Tanaka |
+--------+
1 row in set (0.00 sec)
うん、まぁリレーショナルデータベースですね。
この素の状態(MySQLの [root]ユーザーしかいない)だと他の PCなどからログインできませんし、最高権限ユーザーで全てを行わせるのはセキュリティ上はよくありませんので、MySQLの [subromysql]一般ユーザーを作成します。
mysql> create user 'subromysql'@'%' identified by 'mkd92t-jk';
Query OK, 0 rows affected (0.01 sec)
ユーザーが作成されました。
「mkd92t-jk」がパスワードです。(パスワードの複雑性をクリアしています)
[subromysql]ユーザーを作るのに「'subromysql'@'%'」と記述しています。
これは何かというと、書式的には 'ユーザー名'@'ホスト名(またはIPアドレス)' となっていて、どのホスト(IPアドレス)からのログインを許可するかをユーザー名で設定できるのです。
「%」はワイルドカードで、「どのホストからも OK」という意味になります。
最後に [subromysql@%]ユーザーに、[subrotest]データベースに対する操作の全権限を付与します。
[subromysql@%]ユーザーが、[subrotest]データベースの管理者のイメージですね。
mysql> grant all on subrotest.* to 'subromysql'@'%' with grant option;
Query OK, 0 rows affected (0.00 sec)
| all | 全権 |
| subrotest.* | [subrotest]データベースの何もかも |
| with grant option | 他のユーザーにも権限委譲できる権限を持たせる |
一般ユーザーの設定はこれで OKです。
試しに外部ノード(別な Ubuntu Server 24.04)で MySQL 8.4の mysqlコマンドを使い、 [subromysql]ユーザーでログインしてみました。
subro@UbuntuServer2404-2:~$ mysql -u subromysql -h UbuntuServer2404-1 -p
Enter password: MySQLの[subromysql]ユーザーのパスワード(mkd92t-jk)を入れる
Welcome to the MySQL monitor.  Commands end with ; or \g.
Your MySQL connection id is 10
Server version: 8.4.3 MySQL Community Server - GPL

Copyright (c) 2000, 2024, Oracle and/or its affiliates.

Oracle is a registered trademark of Oracle Corporation and/or its
affiliates. Other names may be trademarks of their respective
owners.

Type 'help;' or '\h' for help. Type '\c' to clear the current input statement.

mysql> use subrotest;
Reading table information for completion of table and column names
You can turn off this feature to get a quicker startup with -A

Database changed
mysql> select * from subrotesttable;
+--------+
| name   |
+--------+
| Tanaka |
+--------+
1 row in set (0.00 sec)
ログインして SELECT文も実行できています。
どうやら良さげです。\(^o^)/
==========
ここから先はリレーショナルデータベース(RDB)の果てしない世界が広がっています。
RDBの使い方や SQLの書き方はのお勉強につき、書籍を 1冊は欲しいところです。
まずは RDBを使えるようになるところから始め、その後にバックアップ/リカバリなど、個々の製品特有のスキルを身に着けましょう。
とりあえずここで書いた通りの事ができれば、他のミドルウェアで RDBをデータストレージとして活用するものの構築のお勉強に進むことができるでしょう。
その意味ではデータベースってインフラなんですよね。
いずれの本も 8.4に対応しているか分かりませんが、基礎は同じですので十分に活用できると思います。
こちらは管理者用ですね。

こちらはDBの利用者(SQLを実行する人)用。


