ミドルウェアから発信されるメールはどんな文面なんだろう?
様々なソフトの環境構築や評価を行うに、最近はメールでの通知機能があるものが多く、どういう内容のメールが発信されるのかを知りたくなったりします。
皆さんが普段使っているインターネット上の送信メールサーバーに送ってやれば事足りるのですが、ソフトの検証作業の場合は、直ぐにメール内容を見たかったり、誤って大量のメールを送ってしまったりすることがあるので、検証用のメールサーバーを作ってしまった方が良いことが多いです。
ここでインストール・設定するメールサーバーは、あくまで自宅での検証として使えるだけにしています。
但しソフト自体はインターネットメールの送受信に耐える本物で、設定を変更することによりちゃんとインターネットメールサーバーとして使えるものです。
利用するのは
- 送信メールサーバー: Postfix
- 受信メールサーバー: Dovecot (但し POP3だけ)
というもので、Linuxサーバーではほぼ標準の鉄板と言って良いでしょう。
メール機能さえ使えれば良いので最新版を求めはせず、aptコマンドでインストールできるものをそのまま使います。
1.環境
Postfix・Dovecotともに Ubuntu Server 24.04に入れます。
メールクライアントは Lubuntu 24.04の Thunderbirdを使いますが、正直コレは何でも良いと思います。
2.受信メールサーバーインストール
まずは受け皿になる受信メールサーバーの Dovecotからインストールします。
ちょっと長いですが、参考に出力を全部載せています。
subro@UbuntuServer2404:~$ sudo apt -y install dovecot-core dovecot-pop3d
パッケージリストを読み込んでいます... 完了
依存関係ツリーを作成しています... 完了
状態情報を読み取っています... 完了
以下の追加パッケージがインストールされます:
  libexttextcat-2.0-0 libexttextcat-data liblua5.4-0 ssl-cert
提案パッケージ:
  dovecot-gssapi dovecot-imapd dovecot-ldap dovecot-lmtpd dovecot-managesieved dovecot-mysql dovecot-pgsql dovecot-sieve dovecot-solr dovecot-sqlite dovecot-submissiond ntp
以下のパッケージが新たにインストールされます:
  dovecot-core dovecot-pop3d libexttextcat-2.0-0 libexttextcat-data liblua5.4-0 ssl-cert
アップグレード: 0 個、新規インストール: 6 個、削除: 0 個、保留: 0 個。
3,781 kB のアーカイブを取得する必要があります。
この操作後に追加で 12.1 MB のディスク容量が消費されます。
取得:1 http://jp.archive.ubuntu.com/ubuntu noble/main amd64 ssl-cert all 1.1.2ubuntu1 [17.8 kB]
取得:2 http://jp.archive.ubuntu.com/ubuntu noble/main amd64 libexttextcat-data all 3.4.7-1build1 [193 kB]
取得:3 http://jp.archive.ubuntu.com/ubuntu noble/main amd64 libexttextcat-2.0-0 amd64 3.4.7-1build1 [13.3 kB]
取得:4 http://jp.archive.ubuntu.com/ubuntu noble/main amd64 liblua5.4-0 amd64 5.4.6-3build2 [166 kB]
取得:5 http://jp.archive.ubuntu.com/ubuntu noble/main amd64 dovecot-core amd64 1:2.3.21+dfsg1-2ubuntu5 [3,354 kB]
取得:6 http://jp.archive.ubuntu.com/ubuntu noble/main amd64 dovecot-pop3d amd64 1:2.3.21+dfsg1-2ubuntu5 [37.3 kB]
3,781 kB を 5秒 で取得しました (826 kB/s)
パッケージを事前設定しています ...
以前に未選択のパッケージ ssl-cert を選択しています。
(データベースを読み込んでいます ... 現在 83508 個のファイルとディレクトリがインストールされています。)
.../0-ssl-cert_1.1.2ubuntu1_all.deb を展開する準備をしています ...
ssl-cert (1.1.2ubuntu1) を展開しています...
以前に未選択のパッケージ libexttextcat-data を選択しています。
.../1-libexttextcat-data_3.4.7-1build1_all.deb を展開する準備をしています ...
libexttextcat-data (3.4.7-1build1) を展開しています...
以前に未選択のパッケージ libexttextcat-2.0-0:amd64 を選択しています。
.../2-libexttextcat-2.0-0_3.4.7-1build1_amd64.deb を展開する準備をしています ...
libexttextcat-2.0-0:amd64 (3.4.7-1build1) を展開しています...
以前に未選択のパッケージ liblua5.4-0:amd64 を選択しています。
.../3-liblua5.4-0_5.4.6-3build2_amd64.deb を展開する準備をしています ...
liblua5.4-0:amd64 (5.4.6-3build2) を展開しています...
以前に未選択のパッケージ dovecot-core を選択しています。
.../4-dovecot-core_1%3a2.3.21+dfsg1-2ubuntu5_amd64.deb を展開する準備をしています ...
dovecot-core (1:2.3.21+dfsg1-2ubuntu5) を展開しています...
以前に未選択のパッケージ dovecot-pop3d を選択しています。
.../5-dovecot-pop3d_1%3a2.3.21+dfsg1-2ubuntu5_amd64.deb を展開する準備をしています ...
dovecot-pop3d (1:2.3.21+dfsg1-2ubuntu5) を展開しています...
ssl-cert (1.1.2ubuntu1) を設定しています ...
Created symlink /etc/systemd/system/multi-user.target.wants/ssl-cert.service → /usr/lib/systemd/system/ssl-cert.service.
libexttextcat-data (3.4.7-1build1) を設定しています ...
liblua5.4-0:amd64 (5.4.6-3build2) を設定しています ...
libexttextcat-2.0-0:amd64 (3.4.7-1build1) を設定しています ...
dovecot-core (1:2.3.21+dfsg1-2ubuntu5) を設定しています ...

Creating config file /etc/dovecot/dovecot.conf with new version

Creating config file /etc/dovecot/dovecot-dict-auth.conf.ext with new version

Creating config file /etc/dovecot/dovecot-dict-sql.conf.ext with new version

Creating config file /etc/dovecot/dovecot-sql.conf.ext with new version

Creating config file /etc/dovecot/conf.d/10-auth.conf with new version

Creating config file /etc/dovecot/conf.d/10-director.conf with new version

Creating config file /etc/dovecot/conf.d/10-logging.conf with new version

Creating config file /etc/dovecot/conf.d/10-mail.conf with new version

Creating config file /etc/dovecot/conf.d/10-master.conf with new version

Creating config file /etc/dovecot/conf.d/10-ssl.conf with new version

Creating config file /etc/dovecot/conf.d/10-tcpwrapper.conf with new version

Creating config file /etc/dovecot/conf.d/15-lda.conf with new version

Creating config file /etc/dovecot/conf.d/15-mailboxes.conf with new version

Creating config file /etc/dovecot/conf.d/90-acl.conf with new version

Creating config file /etc/dovecot/conf.d/90-plugin.conf with new version

Creating config file /etc/dovecot/conf.d/90-quota.conf with new version

Creating config file /etc/dovecot/conf.d/auth-checkpassword.conf.ext with new version

Creating config file /etc/dovecot/conf.d/auth-deny.conf.ext with new version

Creating config file /etc/dovecot/conf.d/auth-dict.conf.ext with new version

Creating config file /etc/dovecot/conf.d/auth-master.conf.ext with new version

Creating config file /etc/dovecot/conf.d/auth-passwdfile.conf.ext with new version

Creating config file /etc/dovecot/conf.d/auth-sql.conf.ext with new version

Creating config file /etc/dovecot/conf.d/auth-static.conf.ext with new version

Creating config file /etc/dovecot/conf.d/auth-system.conf.ext with new version
Created symlink /etc/systemd/system/multi-user.target.wants/dovecot.service → /usr/lib/systemd/system/dovecot.service.
dovecot.socket is a disabled or a static unit, not starting it.
dovecot-pop3d (1:2.3.21+dfsg1-2ubuntu5) を設定しています ...

Creating config file /etc/dovecot/conf.d/20-pop3.conf with new version
ufw (0.36.2-6) のトリガを処理しています ...
man-db (2.12.0-4build2) のトリガを処理しています ...
libc-bin (2.39-0ubuntu8.1) のトリガを処理しています ...
dovecot-core (1:2.3.21+dfsg1-2ubuntu5) のトリガを処理しています ...
Scanning processes...
Scanning candidates...
Scanning linux images...

Running kernel seems to be up-to-date.

Restarting services...

Service restarts being deferred:
 /etc/needrestart/restart.d/dbus.service
 systemctl restart getty@tty1.service
 systemctl restart systemd-logind.service
 systemctl restart unattended-upgrades.service

No containers need to be restarted.

User sessions running outdated binaries:
 subro @ session #5: sshd[1342,1388]
 subro @ user manager service: systemd[1280]

No VM guests are running outdated hypervisor (qemu) binaries on this host.
問題なくインストールできました。
2024年5月1日時点で、Ver.2.3.21が入りました。
細かい運用がなければ、Dovecotのインストールはこれでお終い。
簡単ですね。
3.送信メールサーバーインストール
では、Postfixをインストールします。
こちらも全部載せますが、インストールの途中で後述の問い合わせがあって、それを終わらせると最後まで行くようになっています。
subro@UbuntuServer2404:~$ sudo apt -y install postfix
パッケージリストを読み込んでいます... 完了
依存関係ツリーを作成しています... 完了
状態情報を読み取っています... 完了
以下の追加パッケージがインストールされます:
  libnsl2
提案パッケージ:
  mail-reader postfix-cdb postfix-doc postfix-ldap postfix-lmdb postfix-mta-sts-resolver postfix-mysql
  postfix-pcre postfix-pgsql postfix-sqlite procmail
以下のパッケージが新たにインストールされます:
  libnsl2 postfix
アップグレード: 0 個、新規インストール: 2 個、削除: 0 個、保留: 0 個。
1,296 kB のアーカイブを取得する必要があります。
この操作後に追加で 4,321 kB のディスク容量が消費されます。
取得:1 http://jp.archive.ubuntu.com/ubuntu noble/main amd64 libnsl2 amd64 1.3.0-3build3 [41.4 kB]
取得:2 http://jp.archive.ubuntu.com/ubuntu noble/main amd64 postfix amd64 3.8.6-1build2 [1,254 kB]
1,296 kB を 5秒 で取得しました (271 kB/s)
パッケージを事前設定しています ...
以前に未選択のパッケージ libnsl2:amd64 を選択しています。
(データベースを読み込んでいます ... 現在 84260 個のファイルとディレクトリがインストールされています。)
.../libnsl2_1.3.0-3build3_amd64.deb を展開する準備をしています ...
libnsl2:amd64 (1.3.0-3build3) を展開しています...
以前に未選択のパッケージ postfix を選択しています。
.../postfix_3.8.6-1build2_amd64.deb を展開する準備をしています ...
postfix (3.8.6-1build2) を展開しています...
libnsl2:amd64 (1.3.0-3build3) を設定しています ...
postfix (3.8.6-1build2) を設定しています ...
info: 100 から 999 の範囲でグループ ID を選択しています...
info: グループ `postfix' (グループ ID 113) を追加しています...
info: 100 から 999 の範囲でユーザーID を選択しています...

info: システムユーザ `postfix' (UID 112) を追加しています...
info: 新しいユーザ `postfix' (UID 112) をグループ `postfix' に追加しています...
info: ホームディレクトリ `/var/spool/postfix' は作成しません。
Creating /etc/postfix/dynamicmaps.cf
info: 100 から 999 の範囲でグループ ID を選択しています...
info: グループ `postdrop' (グループ ID 114) を追加しています...
setting myhostname: UbuntuServer2404.subrohouse.internal
setting alias maps
setting alias database
changing /etc/mailname to subrohouse.internal
setting myorigin
setting destinations: subrohouse.internal, $myhostname, UbuntuServer2404, localhost.localdomain, localhost
setting relayhost:
setting mynetworks: 127.0.0.0/8 [::ffff:127.0.0.0]/104 [::1]/128
setting mailbox_size_limit: 0
setting recipient_delimiter: +
setting inet_interfaces: loopback-only
setting default_transport: error
setting relay_transport: error
setting inet_protocols: all
/etc/aliases does not exist, creating it.
WARNING: /etc/aliases exists, but does not have a root alias.

Postfix (main.cf) is now set up with a default configuration.  If you need to
make changes, edit /etc/postfix/main.cf (and others) as needed.  To view
Postfix configuration values, see postconf(1).

After modifying main.cf, be sure to run 'systemctl reload postfix'.

Running newaliases
Created symlink /etc/systemd/system/multi-user.target.wants/postfix.service → /usr/lib/systemd/system/postfix.service.
rsyslog (8.2312.0-3ubuntu9) のトリガを処理しています ...
ufw (0.36.2-6) のトリガを処理しています ...
man-db (2.12.0-4build2) のトリガを処理しています ...
libc-bin (2.39-0ubuntu8.1) のトリガを処理しています ...
Scanning processes...
Scanning candidates...
Scanning linux images...

Running kernel seems to be up-to-date.

Restarting services...

Service restarts being deferred:
 /etc/needrestart/restart.d/dbus.service
 systemctl restart getty@tty1.service
 systemctl restart systemd-logind.service
 systemctl restart unattended-upgrades.service

No containers need to be restarted.

User sessions running outdated binaries:
 subro @ session #3: sshd[1262,1308]
 subro @ user manager service: systemd[1147]

No VM guests are running outdated hypervisor (qemu) binaries on this host.
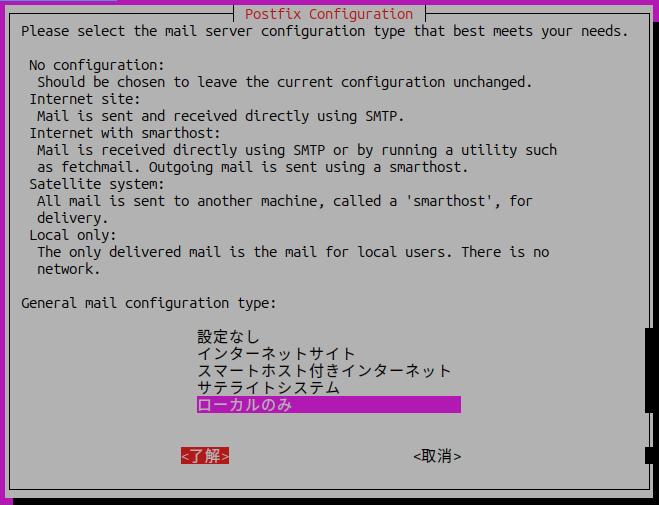
途中の問い合わせはでの操作は以下の通り。
↑↓←→それぞれのキーで移動で移動。
<了解><取消>のところに行ったり来たりするにはTABキー。
<了解><取消>の決定はEnterキーを押します。
1つ目の問い合わせ。
デフォルトは [インターネット] になっていましたが、ここでの使い方に合わせて [ローカルのみ] に変更しました。
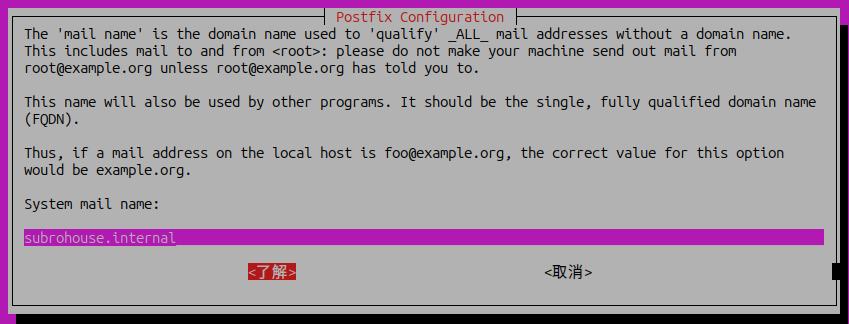
2つ目の問い合わせ。
「mail name」の設定ですが、メールサーバーの設定に余り詳しくなく、ドメインを入れておけば良さげなので、私の環境で使っている [subrohouse.internal]ドメインを入れておきました。
問題なくインストールできました。
2024年5月1日時点で、Ver.3.8.6 が入りました。
デフォルトのままだとループバックインターフェイス [127.0.0.1] でしか待ち受けていないので外部から接続できません。
Postfixの設定ファイル [/etc/postfix/main.cf] を変更します。
root権限が必要なので、sudoコマンドを使って下さい。
自宅のネットワークから送信されるメールを受け取れるようにする設定で私の環境では[192.168.1.0/24]です。
各人のお家のLANに合わせて適宜変更して下さい。
mynetworks = 127.0.0.0/8 [::ffff:127.0.0.0]/104 [::1]/128
    ↓
mynetworks = 127.0.0.0/8 [::ffff:127.0.0.0]/104 [::1]/128 192.168.1.0/24

ループバックインターフェイスだけでなくネットワークに繋がっているネットワークインターフェイスも有効にする設定
inet_interfaces = loopback-only
 ↓
inet_interfaces = all
「もしかして 1つ目の問い合わせ時に『インターネットサイト』を選んでおけばこれはやらなくて済むようになるのでは?」と後になって思いましたが、まぁ良いでしょう。
Postfixを再起動します。
subro@UbuntuServer2404:~$ sudo systemctl restart postfix
Postfixの設定はこれで良いはず。
4.メールクライアント設定
Lubuntu 24.04の Thunderbirdの設定に特化しちゃいますが、他のツールでも似たりよったりかと。
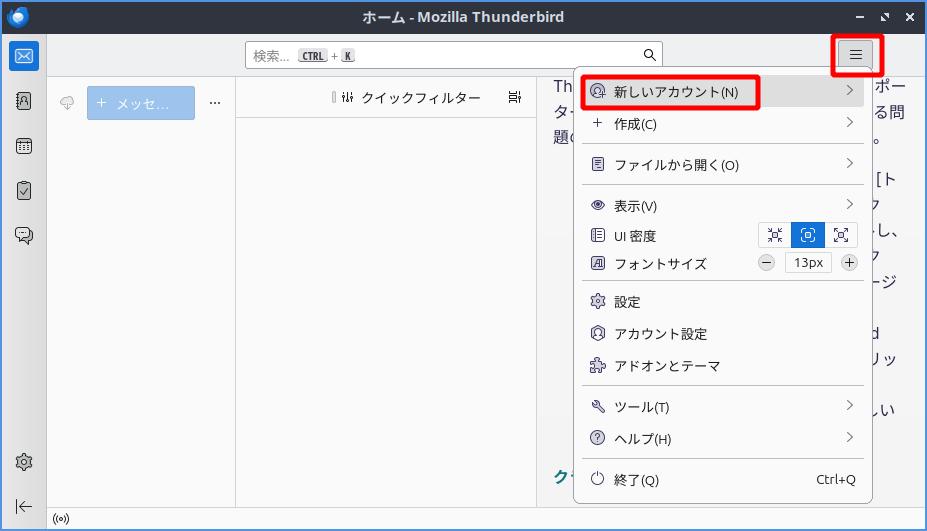
Thunderbirdを立ち上げます。
青い鳥がメールを抱えてるようなアイコンです。

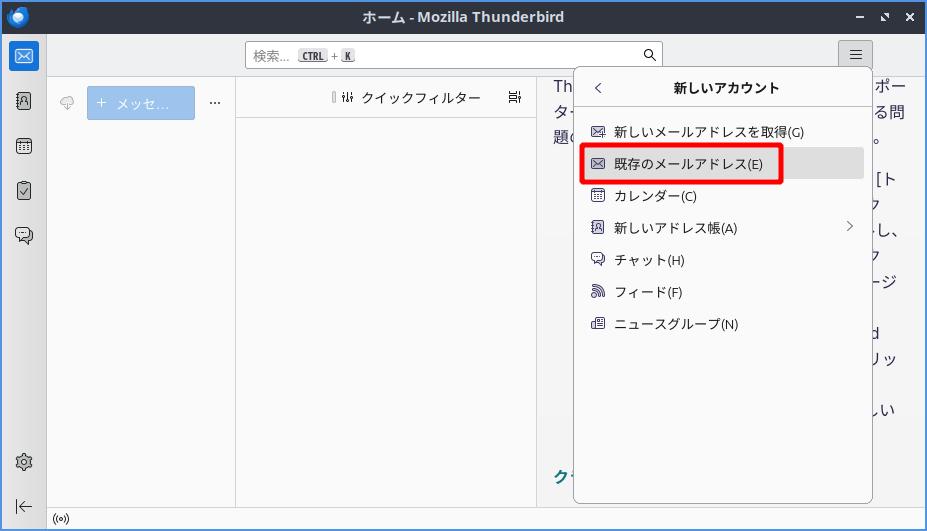
右上のハンバーガーメニューから [新しいアカウント] を選択します。
[新しいアカウント] のメニューが出るので [既存のメールアドレス] を選択します。
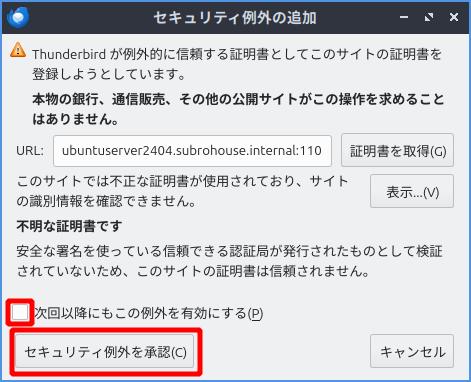
ここからの作業中にこのような画面が出ると思います。
これはメールサーバーになってる Ubuntu Serverのサーバー証明書がオレオレ証明書だからです。
無視したいので、[次回以降にもこの例外を有効にする] のチェックを外し、
セキュリティ例外を承認を押します。
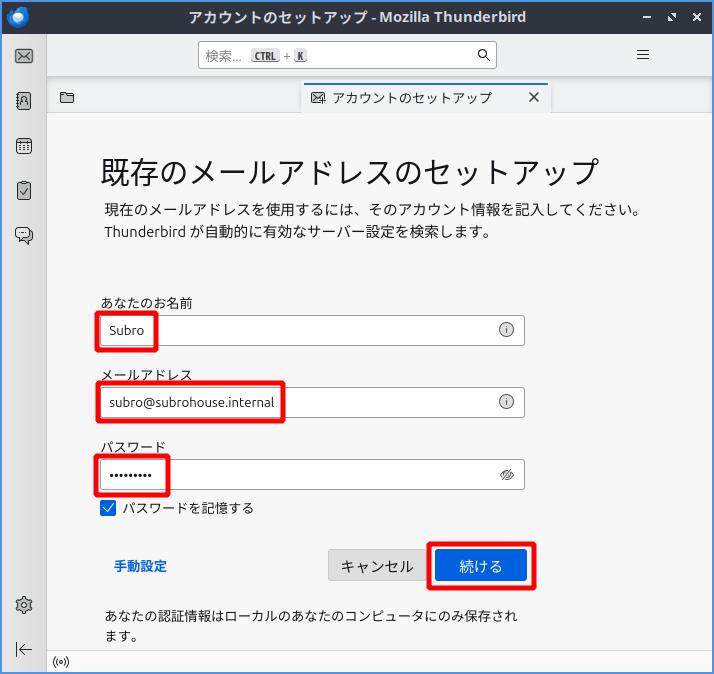
初期設定をします。
あなたのお名前: Thunderbird上で表示される任意の名前
メールアドレス: subro@subrohouse.internal
パスワード: メールサーバー上の OSユーザー [subro] に設定しているパスワード
続けるを押します。
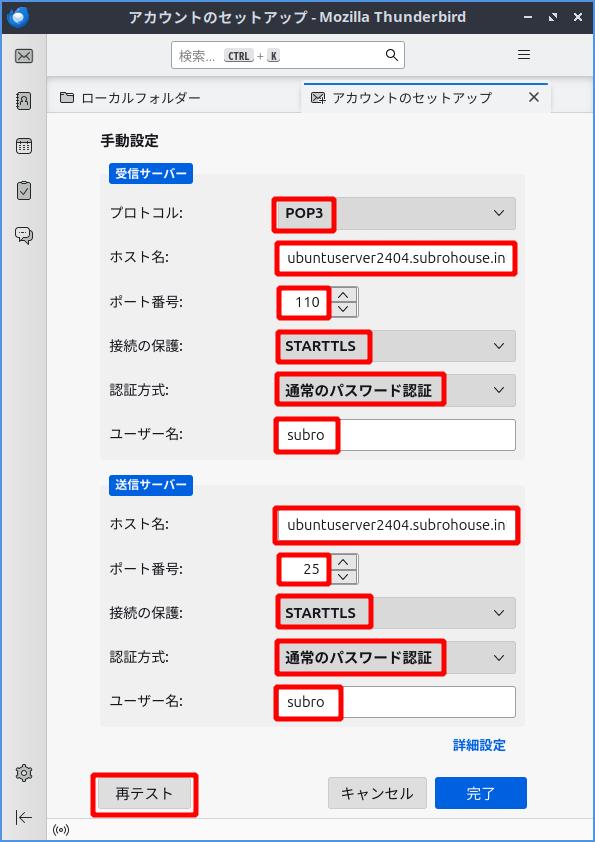
以下の通り入力します。
●受信サーバー
プロトコル: POP3
ホスト名: (dovecotのホスト名か IPアドレス)
ポート番号: 110 (POP3のデフォルト)
接続の保護: STARTTLS
認証方式: 通常のパスワード認証
ユーザー名: (メールサーバー上の OSユーザー [subro])
●送信サーバー
ホスト名: (Postfixのホスト名か IPアドレス)
ポート番号: 25 (SMTPのデフォルト)
接続の保護: STARTTLS
認証方式: 通常のパスワード認証
ユーザー名: (メールサーバー上の OSユーザー [subro])
再テストを押します。
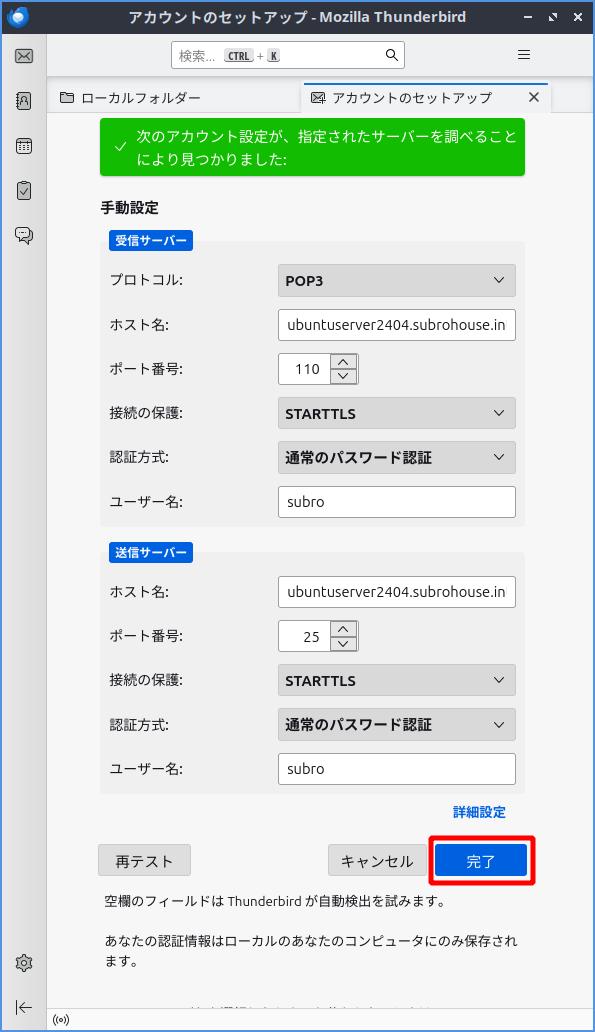
緑色のが出れば設定は良いようです。
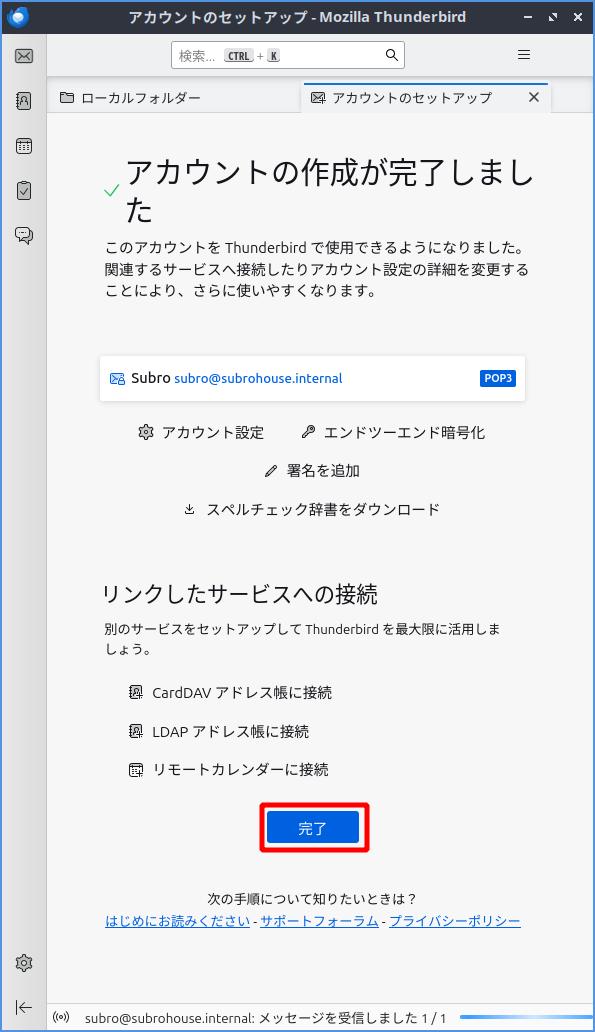
完了を押します。
完了を押します。
送受信テストをしたいのですが、POPを選んでいる場合は Thunderbirdの送信済フォルダ名がサーバーのとズレていて、これを合わせないといけないようです。
[送信済みトレイ] で右クリックすると出てくるメニューから [プロパティ] を選択します。

赤枠の箇所がどうなっているか見ます。
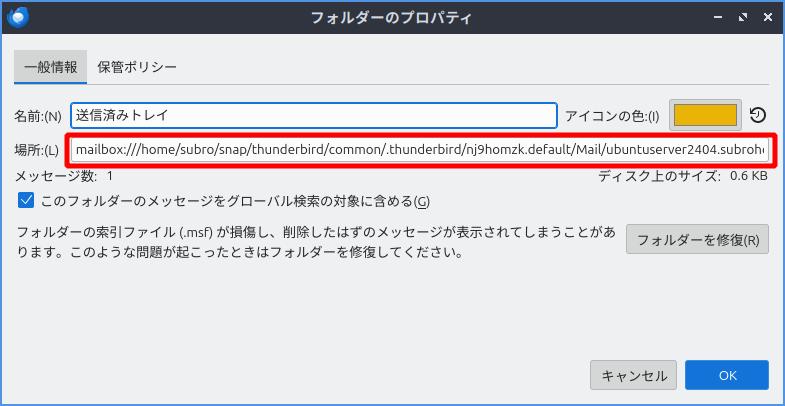
こうなっていました。
mailbox:///home/subro/snap/thunderbird/common/.thunderbird/nj9homzk.default/Mail/ubuntuserver2404.subrohouse.internal/送信済みトレイ
このフォルダ(ディレクトリ)名が「送信済みトレイ」ではなく「Sent」になってないといけないんだとか。
subro@Lubuntu2404:~$ cd /home/subro/snap/thunderbird/common/.thunderbird/nj9homzk.default/Mail/ubuntuserver2404.subrohouse.internal

subro@Lubuntu2404:~/snap/thunderbird/common/.thunderbird/nj9homzk.default/Mail/ubuntuserver2404.subrohouse.internal$ ls -l
合計 28
-rw------- 1 subro subro 3795  5月  1 14:49 Inbox
-rw-rw-r-- 1 subro subro 3210  5月  1 14:49 Inbox.msf
-rw------- 1 subro subro 3795  5月  1 14:49 Trash
-rw-rw-r-- 1 subro subro 3394  5月  1 14:49 Trash.msf
-rw-r--r-- 1 subro subro   25  5月  1 14:46 msgFilterRules.dat
-rw-rw-r-- 1 subro subro  134  5月  1 14:49 popstate.dat
-rw------- 1 subro subro    0  5月  1 14:47 送信済みトレイ
-rw-rw-r-- 1 subro subro 1416  5月  1 14:51 送信済みトレイ.msf
リネームします。
subro@Lubuntu2404:~/snap/thunderbird/common/.thunderbird/nj9homzk.default/Mail/ubuntuserver2404.subrohouse.internal$ mv 送信済みトレイ Sent

subro@Lubuntu2404:~/snap/thunderbird/common/.thunderbird/nj9homzk.default/Mail/ubuntuserver2404.subrohouse.internal$ ls -l
合計 28
-rw------- 1 subro subro 3795  5月  1 14:49 Inbox
-rw-rw-r-- 1 subro subro 1728  5月  1 14:55 Inbox.msf
-rw------- 1 subro subro    0  5月  1 14:47 Sent
-rw------- 1 subro subro 3795  5月  1 14:49 Trash
-rw-rw-r-- 1 subro subro 3411  5月  1 14:55 Trash.msf
-rw-r--r-- 1 subro subro   25  5月  1 14:46 msgFilterRules.dat
-rw-rw-r-- 1 subro subro  104  5月  1 14:56 popstate.dat
-rw-rw-r-- 1 subro subro 1416  5月  1 14:51 送信済みトレイ.msf
リネームできました。
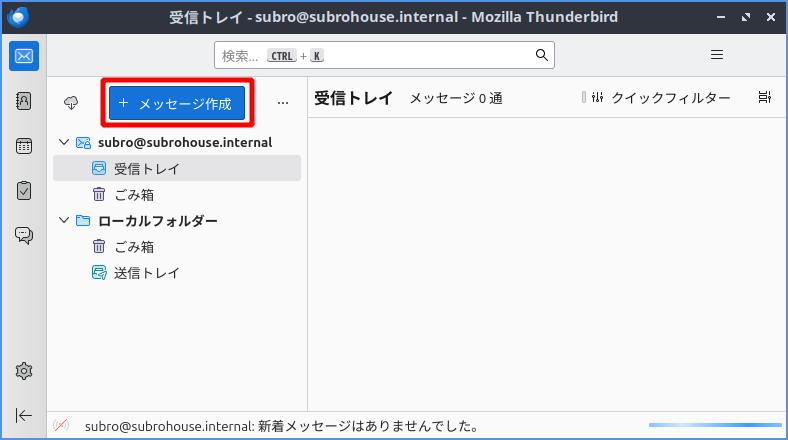
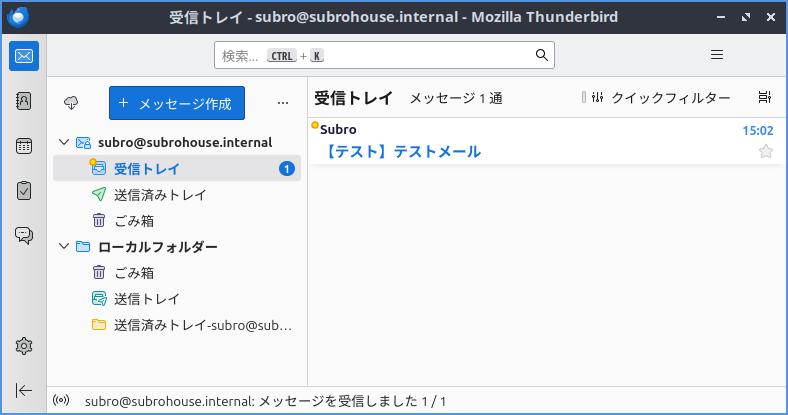
ではテストで自分宛てにメールを送りましょう。
+ メッセージ作成を押します。
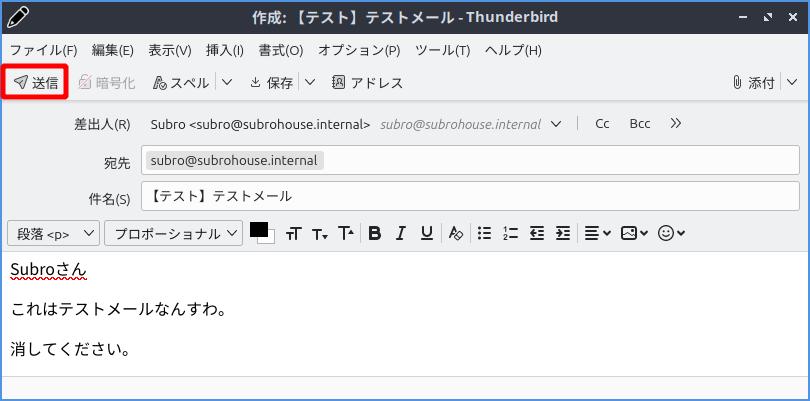
自分宛てのメールをしたためて、送信を押します。
(雲に↓マーク)を押します。
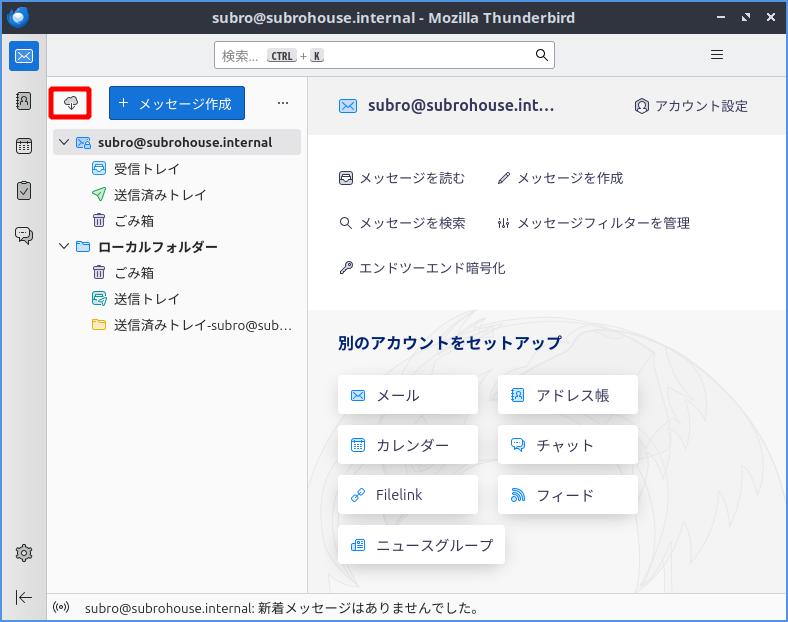
届きました。\(^o^)/
以上で検証用のメールサーバーの構築ができました。
めでたしめでたし。
これで色々なソフト(ミドルウェア)からのメール送信も味わえるというものです。
==========
Dovecotと Postfixでなんちゃってメールサーバーを作りましたが、インストールから設定の過程は本気のものと変わりません。
本気の環境ではセキュリティを高めるため、もっと色々と設定しますし、メールが使えなくなるとマズいですから冗長化構成を取ったりもします。
ただ基本はここでやってることになりますので、まずは自分のメールサーバーを作ってみて、次は送信メールサーバーの転送なんかにチャレンジしてみると良いのではないかと思います。
メールサーバー周りはそれだけで本になってしまいますのでここではとても扱い切れませんが、サーバー構築の中では非常にメジャーなものになります。
Postfixの日本語の本は 2000年代初頭のものしかないようです。
枯れてるからかも知れませんが、最新の書籍を誰か書いてくれないものか…。

かろうじてこちらが 2013年のもの。
