Linux Serverにあるディスク領域を linuxクライアントで利用します。
Windowsを職場で使っている人は、「共有フォルダ」「ファイルサーバー」[ネットワークドライブ」など様々な言葉で言われていますが、皆で共有するファイルの置き場を利用していることと思います。
仕組みを簡単な絵にするとこんな感じ。
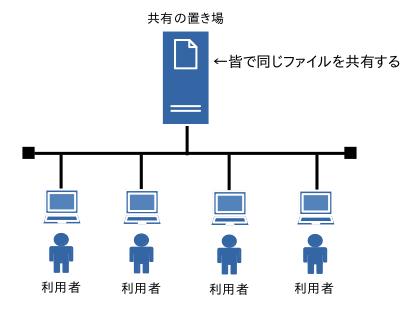
皆で共有するファイルの置き場所(これもサーバーです)を作って利用するとすごく便利なことはもう説明の必要なないでしょう。
上の図で「共有の置き場」と書いているコンピューターを広義に「ファイルサーバー」って言います。
サーバーエンジニアとして、WEBサーバーと並んで一番関わる可能性の高いサーバーです。
今回はこのファイルサーバーを作っちゃおうという話なんですが、一つ知っておかなければなりません。
それは Linuxと Windowsではファイルサーバーの仕組みが違うということです。
厳密に言うとファイルサーバーとクライアントPCがネットワーク通信する際の通信プロトコルに違うものを使っています。
その違いによって、よく表に出てくる用語には以下の 2つがあります。
- Linux: NFS (Network File System)
- Windows: SMB (Server Message Block)
通信プロトコルが違うのでそもそも通信が成り立たないということで、LinuxクライアントPCと WindowsクライアントPCの混在環境では 1つのファイルサーバーを共有することは基本的にできません。
但し最近はお互い歩み寄りがあり、やろうと思えばいくつかの方法で実現できますが、企業ではクライアントPCは基本的に Windowsですので、Windowsでファイルサーバーを作るのが普通でしょう。
しかしここでは、それに反して Linuxでファイルサーバーを作って、LinuxのクライアントPCで共有する、という手順を書いていきます。
これはこれでニーズのある話ではあります。
1.NFS
Unixの世界ではずっと前から NFS(Network File System)という規約があって、それを実装したプログラムによって実現されていました。
Linuxにも Unixと同じく NFSのサーバーとクライアントのプログラムがあり、これを使って共有フォルダ(Windows用語)、いや、共有ディレクトリを作ってみます。
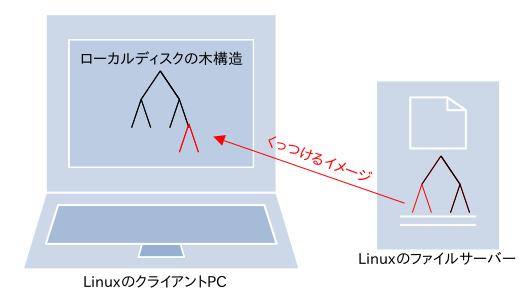
Linuxのファイルシステムは、Windowsのドライブの観念がなくて、1つの木構造に全てが収まっています。
Windowsの環境だと「ネットワークドライブ」という形で新しいドライブが増えるイメージですが、Linux(NFS)ではファイルサーバーの木構造の一部をクライアントPCの木構造のどこかにくっつけるイメージになります。
2.環境
Ubuntu Server 22.04を ファイルサーバーに(これを「NFSサーバー」と呼ぶので以降そう書きます)、Lubuntu 22.04をクライアントPCにして、NFSサーバーのディスク上のファイルを読み書きしてみます。
3.NFSサーバー構築
Ubuntu Serverに [nfs-kernel-server]パッケージをインストールします。
subro@UbuntuServer2204:~$ sudo apt install -y nfs-kernel-server
パッケージリストを読み込んでいます... 完了
依存関係ツリーを作成しています... 完了
状態情報を読み取っています... 完了
以下の追加パッケージがインストールされます:
  keyutils libnfsidmap1 nfs-common rpcbind
提案パッケージ:
  watchdog
以下のパッケージが新たにインストールされます:
  keyutils libnfsidmap1 nfs-common nfs-kernel-server rpcbind
アップグレード: 0 個、新規インストール: 5 個、削除: 0 個、保留: 0 個。
522 kB のアーカイブを取得する必要があります。
この操作後に追加で 1,973 kB のディスク容量が消費されます。
取得:1 http://jp.archive.ubuntu.com/ubuntu jammy/main amd64 libnfsidmap1 amd64 1:2.6.1-1ubuntu1 [43.5 kB]
取得:2 http://jp.archive.ubuntu.com/ubuntu jammy/main amd64 rpcbind amd64 1.2.6-2build1 [46.6 kB]
取得:3 http://jp.archive.ubuntu.com/ubuntu jammy/main amd64 keyutils amd64 1.6.1-2ubuntu3 [50.4 kB]
取得:4 http://jp.archive.ubuntu.com/ubuntu jammy/main amd64 nfs-common amd64 1:2.6.1-1ubuntu1 [241 kB]
取得:5 http://jp.archive.ubuntu.com/ubuntu jammy/main amd64 nfs-kernel-server amd64 1:2.6.1-1ubuntu1 [140 kB]
522 kB を 0秒 で取得しました (1,084 kB/s)
以前に未選択のパッケージ libnfsidmap1:amd64 を選択しています。
(データベースを読み込んでいます ... 現在 85614 個のファイルとディレクトリがインストールされています。)
.../libnfsidmap1_1%3a2.6.1-1ubuntu1_amd64.deb を展開する準備をしています ...
libnfsidmap1:amd64 (1:2.6.1-1ubuntu1) を展開しています...
以前に未選択のパッケージ rpcbind を選択しています。
.../rpcbind_1.2.6-2build1_amd64.deb を展開する準備をしています ...
rpcbind (1.2.6-2build1) を展開しています...
以前に未選択のパッケージ keyutils を選択しています。
.../keyutils_1.6.1-2ubuntu3_amd64.deb を展開する準備をしています ...
keyutils (1.6.1-2ubuntu3) を展開しています...
以前に未選択のパッケージ nfs-common を選択しています。
.../nfs-common_1%3a2.6.1-1ubuntu1_amd64.deb を展開する準備をしています ...
nfs-common (1:2.6.1-1ubuntu1) を展開しています...
以前に未選択のパッケージ nfs-kernel-server を選択しています。
.../nfs-kernel-server_1%3a2.6.1-1ubuntu1_amd64.deb を展開する準備をしています ...
nfs-kernel-server (1:2.6.1-1ubuntu1) を展開しています...
libnfsidmap1:amd64 (1:2.6.1-1ubuntu1) を設定しています ...
rpcbind (1.2.6-2build1) を設定しています ...
Created symlink /etc/systemd/system/multi-user.target.wants/rpcbind.service → /lib/systemd/system/rpcbind.service.
Created symlink /etc/systemd/system/sockets.target.wants/rpcbind.socket → /lib/systemd/system/rpcbind.socket.
keyutils (1.6.1-2ubuntu3) を設定しています ...
nfs-common (1:2.6.1-1ubuntu1) を設定しています ...

Creating config file /etc/idmapd.conf with new version

Creating config file /etc/nfs.conf with new version
システムユーザー `statd' (UID 118) を追加しています...
新しいユーザー `statd' (UID 118) をグループ `nogroup' に追加しています...
ホームディレクトリ `/var/lib/nfs' を作成しません。
Created symlink /etc/systemd/system/multi-user.target.wants/nfs-client.target → /lib/systemd/system/nfs-client.target.
Created symlink /etc/systemd/system/remote-fs.target.wants/nfs-client.target → /lib/systemd/system/nfs-client.target.
auth-rpcgss-module.service is a disabled or a static unit, not starting it.
nfs-idmapd.service is a disabled or a static unit, not starting it.
nfs-utils.service is a disabled or a static unit, not starting it.
proc-fs-nfsd.mount is a disabled or a static unit, not starting it.
rpc-gssd.service is a disabled or a static unit, not starting it.
rpc-statd-notify.service is a disabled or a static unit, not starting it.
rpc-statd.service is a disabled or a static unit, not starting it.
rpc-svcgssd.service is a disabled or a static unit, not starting it.
rpc_pipefs.target is a disabled or a static unit, not starting it.
var-lib-nfs-rpc_pipefs.mount is a disabled or a static unit, not starting it.
nfs-kernel-server (1:2.6.1-1ubuntu1) を設定しています ...
Created symlink /etc/systemd/system/nfs-client.target.wants/nfs-blkmap.service → /lib/systemd/system/nfs-blkmap.service.
Created symlink /etc/systemd/system/multi-user.target.wants/nfs-server.service → /lib/systemd/system/nfs-server.service.
nfs-mountd.service is a disabled or a static unit, not starting it.
nfsdcld.service is a disabled or a static unit, not starting it.

Creating config file /etc/exports with new version

Creating config file /etc/default/nfs-kernel-server with new version
man-db (2.10.2-1) のトリガを処理しています ...
libc-bin (2.35-0ubuntu3.1) のトリガを処理しています ...
Scanning processes...
Scanning linux images...

Running kernel seems to be up-to-date.

No services need to be restarted.

No containers need to be restarted.

No user sessions are running outdated binaries.

No VM guests are running outdated hypervisor (qemu) binaries on this host.
インストールできました。
NFSサーバーに必要なプログラムはこれで OKです。
4.共有ディスク領域の公開
ファイルサーバーのファイルシステムの木構造のどのディレクトリから下をクライアントPCに公開するかの設定をします。
赤破線の部分のことです。
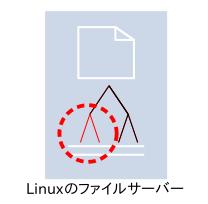
既存のディレクトリでも良いのですが、今回はネットワーク上に提供する専用に [/nfs]ディレクトリを作りました。
subro@UbuntuServer2204:~$ sudo mkdir /nfs
[/nfs]ディレクトリは色々な人に使わせることを前提として、パーミッションを [drwxrwxrwx](777) にします。
実際にはパーミッションを絞るか、次の作業の設定ファイルでアクセス制限をするのが良いでしょう。
subro@UbuntuServer2204:~$ sudo chmod 777 /nfs
次に [/nfs]ディレクトリを公開するための設定をします。
NFSサーバーの設定ファイル [/etc/exports]ファイルを以下の内容に修正します。
インストール直後はファイルはあるものの設定は空でした。
subro@UbuntuServer2204:~$ cat /etc/exports
/nfs *(rw)
この設定は
[/nfs]ディレクトリを、
全てのクライアントPCの全てのユーザー(*)に、
読み込みと書き込みを許可する((rw))
という意味になります。
ここの設定で、細々とアクセス制限をかけることができます。
NFSのサーバープログラム(nfsd)は既に開始されているので、設定を有効にするため NFSサービスの再起動をします。
subro@UbuntuServer2204:~$ sudo systemctl restart nfs-server
showmountコマンド(show mount information for an NFS server)に [-e]オプションで、共有ディレクトリの情報を表示できます。
subro@UbuntuServer2204:~$ showmount -e
Export list for UbuntuServer2204:
/nfs *
良さげです。
この作業を(コマンドから取ってでしょうが)「エクスポート」って言いますね。
Unixの OSなんかだと「シェア」って言ったり。
5.クライアントPC側作業
このクライアントPCの事を「NFSクライアント」って言います。
subro@UbuntuServer2204:~$ sudo apt install -y nfs-common
パッケージリストを読み込んでいます... 完了
依存関係ツリーを作成しています... 完了
状態情報を読み取っています... 完了
以下の追加パッケージがインストールされます:
  libnfsidmap1 rpcbind
提案パッケージ:
  open-iscsi watchdog
以下のパッケージが新たにインストールされます:
  libnfsidmap1 nfs-common rpcbind
アップグレード: 0 個、新規インストール: 3 個、削除: 0 個、保留: 0 個。
331 kB のアーカイブを取得する必要があります。
この操作後に追加で 1,284 kB のディスク容量が消費されます。
取得:1 http://archive.ubuntu.com/ubuntu jammy/main amd64 libnfsidmap1 amd64 1:2.6.1-1ubuntu1 [43.5 kB]
取得:2 http://archive.ubuntu.com/ubuntu jammy/main amd64 rpcbind amd64 1.2.6-2build1 [46.6 kB]
取得:3 http://archive.ubuntu.com/ubuntu jammy/main amd64 nfs-common amd64 1:2.6.1-1ubuntu1 [241 kB]
331 kB を 2秒 で取得しました (205 kB/s)
以前に未選択のパッケージ libnfsidmap1:amd64 を選択しています。
(データベースを読み込んでいます ... 現在 329678 個のファイルとディレクトリがインストールされています。)
.../libnfsidmap1_1%3a2.6.1-1ubuntu1_amd64.deb を展開する準備をしています ...
libnfsidmap1:amd64 (1:2.6.1-1ubuntu1) を展開しています...
以前に未選択のパッケージ rpcbind を選択しています。
.../rpcbind_1.2.6-2build1_amd64.deb を展開する準備をしています ...
rpcbind (1.2.6-2build1) を展開しています...
以前に未選択のパッケージ nfs-common を選択しています。
.../nfs-common_1%3a2.6.1-1ubuntu1_amd64.deb を展開する準備をしています ...
nfs-common (1:2.6.1-1ubuntu1) を展開しています...
libnfsidmap1:amd64 (1:2.6.1-1ubuntu1) を設定しています ...
rpcbind (1.2.6-2build1) を設定しています ...
Created symlink /etc/systemd/system/multi-user.target.wants/rpcbind.service → /lib/systemd/system/rpcbind.service.
Created symlink /etc/systemd/system/sockets.target.wants/rpcbind.socket → /lib/systemd/system/rpcbind.socket.
nfs-common (1:2.6.1-1ubuntu1) を設定しています ...

Creating config file /etc/idmapd.conf with new version

Creating config file /etc/nfs.conf with new version
Adding system user `statd' (UID 125) ...
Adding new user `statd' (UID 125) with group `nogroup' ...
Not creating home directory `/var/lib/nfs'.
Created symlink /etc/systemd/system/multi-user.target.wants/nfs-client.target → /lib/systemd/system/nfs-client.target.
Created symlink /etc/systemd/system/remote-fs.target.wants/nfs-client.target → /lib/systemd/system/nfs-client.target.
auth-rpcgss-module.service is a disabled or a static unit, not starting it.
nfs-idmapd.service is a disabled or a static unit, not starting it.
nfs-utils.service is a disabled or a static unit, not starting it.
proc-fs-nfsd.mount is a disabled or a static unit, not starting it.
rpc-gssd.service is a disabled or a static unit, not starting it.
rpc-statd-notify.service is a disabled or a static unit, not starting it.
rpc-statd.service is a disabled or a static unit, not starting it.
rpc-svcgssd.service is a disabled or a static unit, not starting it.
rpc_pipefs.target is a disabled or a static unit, not starting it.
var-lib-nfs-rpc_pipefs.mount is a disabled or a static unit, not starting it.
man-db (2.10.2-1) のトリガを処理しています ...
libc-bin (2.35-0ubuntu3.1) のトリガを処理しています ...
インストールできました。
必要なプログラムはこれでOKです。
クライアントPCでは NFSサーバーの共有ディレクトリを、クライアントのどのディレクトリとしてくっつけるかを決めないといけません。
この箇所を「マウントポイント」と言います。
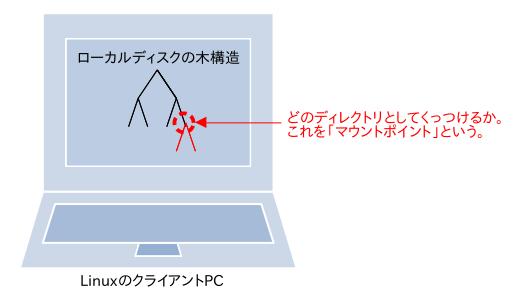
こちらでも [/nfs]ディレクトリを作りました。
subro@Ubuntu2204:~$ sudo mkdir /nfs
ここで mountコマンド(mount a filesystem)で NFSサーバーの共有ディレクトリをくっつけることができます。
この作業を「マウント」か「NFSマウント」と言います。
ただ、コマンドでやると OS停止後は無効になってしまうので、OS起動時に自動でマウントするため [/etc/fstab]ファイルに以下の通り記述します。
※マシン名は [/etc/hosts]ファイルで名前解決済の前提です。
subro@Ubuntu2204:~$ cat /etc/fstab
# /etc/fstab: static file system information.
#
# Use 'blkid' to print the universally unique identifier for a device; this may
# be used with UUID= as a more robust way to name devices that works even if
# disks are added and removed. See fstab(5).
#
#
UUID=0b8c5a27-deae-4c31-9ae1-0c96047c7ddb /              ext4    defaults   0 1
/swapfile                                 swap           swap    defaults   0 0

UbuntuServer2204-2:/nfs    /nfs   nfs    defaults 0 0
これで OS起動時の設定は OKですが、今はまだ繋がってません。
mountコマンド(mount a filesystem)に [-a]オプションで、[/etc/fstab]ファイルに書いた状態にしてくれます。
subro@Ubuntu2204:~$ sudo mount -a
dfコマンド(report file system disk space usage)で、ディスクの状態を見ると、ピンクの行が増えていて、NFSマウントができていることが分かります。
subro@Ubuntu2204:~$ df
Filesystem              1K-blocks     Used Available Use% Mounted on
tmpfs                      398320     1752    396568   1% /run
/dev/sda1                40967152 24686484  14167452  64% /
tmpfs                     1991592        0   1991592   0% /dev/shm
tmpfs                        5120        4      5116   1% /run/lock
tmpfs                      398316       84    398232   1% /run/user/1000
UbuntuServer2204:/nfs    18631424  7057152  10602496  40% /nfs
これでセッティングは完了です。
6.クライアントPCで NFS共有ディレクトリに書き込み
クライアントPCの [/nfs]ディレクトリ下にファイルを作ってみます。
subro@Ubuntu2204:~$ touch /nfs/aaa

subro@Ubuntu2204:~$ ls -l /nfs
total 0
-rw-rw-r-- 1 subro subro 0  8月 23 14:04 aaa
ファイルを書くことができました。
これをサーバー側で見てみます。
subro@UbuntuServer2204:~$ ls -l /nfs
合計 0
-rw-rw-r-- 1 subro subro 0  8月 23 14:04 aaa
クライアントで作った aaa ファイルがあります。
ちゃんと共有ディレクトリとして動いていますね。
==========
以上で NFSは終わりですが、いかがだったでしょうか。
昔 UNIXのワークステーションをクライアントマシンとして使っていた頃に [/home]ディレクトリを全てのクライアントで共有して、どのクライアントマシンにログインしても自分のホームディレクトリが見えるようにしたりしていました。
昨今では LinuxのクライアントPCを大規模の使うことはなく、クライアントPCとの関係において NFSが必要になる要件はないように思います。
どういうケースでNFSが使われるかというと、スケールアウトした Linuxサーバー群が同一のデータファイルを参照したいなどの要件で NFSを使うことは考えられますね。
その際にはNFSサーバーではリードオンリーで共有するなどの工夫があるように思います。
派手なテクニックではないですが、運用設計のために知っておいた方が良いと思って書きました。
Linuxサーバーで Windows用のファイルサーバーを作りたい、そういう要件から作られたのが SAMBAです。
サーバーのディスク領域を共有させる仕組みの根本は似たり寄ったりなので、SAMBAにもチャレンジしてみると面白いと思いますよ。
NFSは OSの一部と考えられているのか、NFSの本ってありません。
SAMBAは「ファイルサーバーを作ろう!」の定番なので、定期的に新しいのが出ますね。
