折角オンプレの Amazon Linux 2を導入したので、そこで Zabbixを動かす。
「オンプレで Amazon Linux 2を導入」で Amazon Linux 2の環境を作り、
「オンプレ Amazon Linux 2の設定」で、SSH接続できるようになりました。
ここまで作ったのだから、何かやろうと Zabbixを入れて Windowsサーバーを監視します。
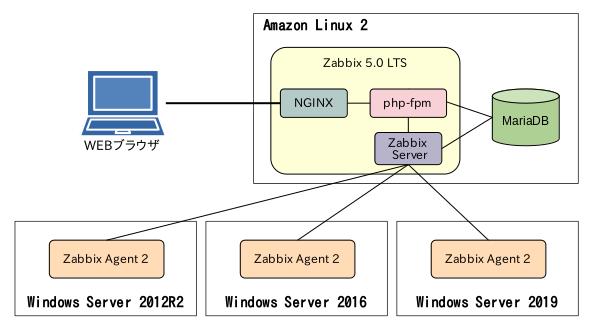
システムのセットはこんな感じ。
- Amazon Linux 2
- Zabbix 5.0.36-1 LTS
- MariaDB 5.5.68-1
- NGINX 1.16.1
監視対象の Windowsサーバーは、2012・2016・2019の 3つです。
オーソドックスな形で、絵にするとこんな感じです。
上に挙げた 2つの手順に従って、Amazon Linux 2に [ec2-user]ユーザーで SSH接続できる所からスタートします。
Zabbixのインストール手順はこちらです。
Download and install Zabbix
ここにはインストール先 OSに Amazon Linux 2が無いんですが、この OSは RedHat Enterprise Linux 7に近いと言われていますので、CentOS 7を選んでいます。
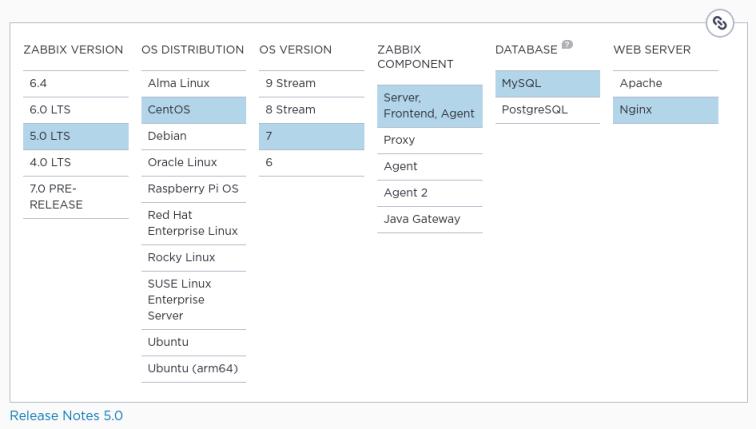
WEBサーバーを NGINXにしているのは私の趣味です。
これで何かダウンロードされるのではなく、このセットでの手順が下に表示されますので、それに従ってやっていきます。
1.MariaDBインストール
手順では DBのインストールが済んでいる前提になっていますので先に入れておきます。
本当は MySQLを入れたいんですが、Amazon Linux 2が参照しているパッケージリポジトリ(AWSが管理していると思われる)には以下のように MySQLはクライアント用のドライバしか無いんですね。
だけど MySQLから泣き別れた MariaDBはあります。
[ec2-user@amazonlinux2 ~]$ yum search mysql
読み込んだプラグイン:langpacks, priorities, update-motd
amzn2-core                                                                  | 3.7 kB  00:00:00
amzn2extra-docker                                                           | 3.0 kB  00:00:00
(1/5): amzn2-core/2/x86_64/group_gz                                         | 2.5 kB  00:00:00
(2/5): amzn2-core/2/x86_64/updateinfo                                       | 637 kB  00:00:00
(3/5): amzn2extra-docker/2/x86_64/primary_db                                | 106 kB  00:00:00
(4/5): amzn2extra-docker/2/x86_64/updateinfo                                | 9.8 kB  00:00:00
(5/5): amzn2-core/2/x86_64/primary_db                                       |  74 MB  00:00:06
================================== N/S matched: mysql ========================================
MySQL-python.x86_64 : An interface to MySQL
apr-util-mysql.x86_64 : APR utility library MySQL DBD driver
dovecot-mysql.x86_64 : MySQL back end for dovecot
freeradius-mysql.x86_64 : MySQL support for freeradius
libdbi-dbd-mysql.x86_64 : MySQL plugin for libdbi
mysql-connector-java.noarch : Official JDBC driver for MySQL
mysql-connector-odbc.x86_64 : ODBC driver for MySQL
pcp-pmda-mysql.x86_64 : Performance Co-Pilot (PCP) metrics for MySQL
perl-DBD-MySQL.x86_64 : A MySQL interface for Perl
php-mysql.x86_64 : A module for PHP applications that use MySQL databases
php-mysqlnd.x86_64 : A module for PHP applications that use MySQL databases
qt-mysql.x86_64 : MySQL driver for Qt's SQL classes
qt-mysql.i686 : MySQL driver for Qt's SQL classes
qt3-MySQL.x86_64 : MySQL drivers for Qt 3's SQL classes
qt3-MySQL.i686 : MySQL drivers for Qt 3's SQL classes
qt5-qtbase-mysql.x86_64 : MySQL driver for Qt5's SQL classes
qt5-qtbase-mysql.i686 : MySQL driver for Qt5's SQL classes
redland-mysql.x86_64 : MySQL storage support for Redland
rsyslog-mysql.x86_64 : MySQL support for rsyslog
mariadb.x86_64 : A community developed branch of MySQL
mariadb-devel.x86_64 : Files for development of MariaDB/MySQL applications
mariadb-libs.x86_64 : The shared libraries required for MariaDB/MySQL clients
mariadb-libs.i686 : The shared libraries required for MariaDB/MySQL clients

  Name and summary matches only, use "search all" for everything.

[ec2-user@amazonlinux2 ~]$ yum search mariadb
読み込んだプラグイン:langpacks, priorities, update-motd
================================== N/S matched: mariadb ======================================
mariadb-bench.x86_64 : MariaDB benchmark scripts and data
mariadb-devel.x86_64 : Files for development of MariaDB/MySQL applications
mariadb-embedded.x86_64 : MariaDB as an embeddable library
mariadb-embedded-devel.x86_64 : Development files for MariaDB as an embeddable library
mariadb-libs.x86_64 : The shared libraries required for MariaDB/MySQL clients
mariadb-libs.i686 : The shared libraries required for MariaDB/MySQL clients
mariadb-server.x86_64 : The MariaDB server and related files
mariadb.x86_64 : A community developed branch of MySQL
mariadb-test.x86_64 : The test suite distributed with MariaD

  Name and summary matches only, use "search all" for everything.
MariaDBじゃダメということは無いので MariaDBでやりますけど、AWSの意図はどこにあるんでしょう。
MariaDBをインストールします。
[ec2-user@amazonlinux2 ~]$ sudo yum install -y mariadb-server
読み込んだプラグイン:langpacks, priorities, update-motd
amzn2-core                                                                  | 3.7 kB  00:00:00
amzn2extra-docker                                                           | 3.0 kB  00:00:00

〜〜〜 途中省略 〜〜〜

インストール:
  mariadb-server.x86_64 1:5.5.68-1.amzn2.0.1

依存性関連をインストールしました:
  mariadb.x86_64 1:5.5.68-1.amzn2.0.1                    perl-Compress-Raw-Bzip2.x86_64 0:2.061-3.amzn2.0.2
  perl-Compress-Raw-Zlib.x86_64 1:2.061-4.amzn2.0.2      perl-DBD-MySQL.x86_64 0:4.023-6.amzn2
  perl-DBI.x86_64 0:1.627-4.amzn2.0.2                    perl-Data-Dumper.x86_64 0:2.145-3.amzn2.0.2
  perl-IO-Compress.noarch 0:2.061-2.amzn2                perl-Net-Daemon.noarch 0:0.48-5.amzn2
  perl-PlRPC.noarch 0:0.2020-14.amzn2

完了しました!
特に問題なくインストールできました。
OS起動時に自動起動するようにしておきましょう。
[ec2-user@amazonlinux2 ~]$ sudo systemctl enable mariadb.service
Created symlink from /etc/systemd/system/multi-user.target.wants/mariadb.service to /usr/lib/systemd/system/mariadb.service.
自動起動設定できましたので、この設定を使って MariaDBを起動します。
[ec2-user@amazonlinux2 ~]$ sudo systemctl start mariadb.service
MariaDBが正常に立ち上がっているか確認します。
[ec2-user@amazonlinux2 ~]$ systemctl status mariadb.service
● mariadb.service - MariaDB database server
   Loaded: loaded (/usr/lib/systemd/system/mariadb.service; enabled; vendor preset: disabled)
   Active: active (running) since 火 2023-07-11 16:35:02 JST; 1min 29s ago
  Process: 7675 ExecStartPost=/usr/libexec/mariadb-wait-ready $MAINPID (code=exited, status=0/SUCCESS)
  Process: 7591 ExecStartPre=/usr/libexec/mariadb-prepare-db-dir %n (code=exited, status=0/SUCCESS)
 Main PID: 7674 (mysqld_safe)
   CGroup: /system.slice/mariadb.service
           ├─7674 /bin/sh /usr/bin/mysqld_safe --basedir=/usr
           └─7839 /usr/libexec/mysqld --basedir=/usr --datadir=/var/lib/mysql --plugin-dir=/usr/lib64/mysql/plugin --log-error=/var/log/mariadb/mariadb.log --pid-file=/var/run/mariadb/mariadb.p...

 7月 11 16:34:58 amazonlinux2 systemd[1]: Starting MariaDB database server...
 7月 11 16:34:58 amazonlinux2 mariadb-prepare-db-dir[7591]: Initializing MariaDB database
 7月 11 16:34:59 amazonlinux2 mariadb-prepare-db-dir[7591]: 230711 16:34:59 [Note] /usr/libexec/mysqld (mysqld 5.5.68-MariaDB) starting as process 7660 ...
 7月 11 16:35:00 amazonlinux2 mariadb-prepare-db-dir[7591]: 230711 16:35:00 [Note] /usr/libexec/mysqld (mysqld 5.5.68-MariaDB) starting as process 7667 ...
 7月 11 16:35:00 amazonlinux2 mysqld_safe[7674]: 230711 16:35:00 mysqld_safe Logging to '/var/log/mariadb/mariadb.log'.
 7月 11 16:35:00 amazonlinux2 mysqld_safe[7674]: 230711 16:35:00 mysqld_safe Starting mysqld daemon with databases from /var/lib/mysql
 7月 11 16:35:02 amazonlinux2 systemd[1]: Started MariaDB database server.
問題ないようです。
MySQLと同じく、セキュアにするための作業をやっておきます。
[ec2-user@amazonlinux2 ~]$ mysql_secure_installation

NOTE: RUNNING ALL PARTS OF THIS SCRIPT IS RECOMMENDED FOR ALL MariaDB
      SERVERS IN PRODUCTION USE!  PLEASE READ EACH STEP CAREFULLY!

In order to log into MariaDB to secure it, we'll need the current
password for the root user.  If you've just installed MariaDB, and
you haven't set the root password yet, the password will be blank,
so you should just press enter here.

MariaDBの[root]ユーザーのパスワードを聞いています
Enter current password for root (enter for none): Enterキー  ← 初期はカラになってるのでEnterキーを押します
OK, successfully used password, moving on...

Setting the root password ensures that nobody can log into the MariaDB
root user without the proper authorisation.

MariaDBの[root]ユーザーのパスワードを設定するか聞いています
Set root password? [Y/n] Y
New password:新パスワード
Re-enter new password:新パスワードをもう一回
Password updated successfully!
Reloading privilege tables..
 ... Success!


By default, a MariaDB installation has an anonymous user, allowing anyone
to log into MariaDB without having to have a user account created for
them.  This is intended only for testing, and to make the installation
go a bit smoother.  You should remove them before moving into a
production environment.

匿名ユーザーのパスワードを設定するか聞いています
Remove anonymous users? [Y/n] Y
 ... Success!

他のノードからの[root]ユーザーでのアクセスを禁止するか聞いています
Normally, root should only be allowed to connect from 'localhost'.  This
ensures that someone cannot guess at the root password from the network.

Disallow root login remotely? [Y/n] Y
 ... Success!

By default, MariaDB comes with a database named 'test' that anyone can
access.  This is also intended only for testing, and should be removed
before moving into a production environment.

デフォルトで入っているテスト用データベースを削除するか聞いています
Remove test database and access to it? [Y/n] Y
 - Dropping test database...
 ... Success!
 - Removing privileges on test database...
 ... Success!

Reloading the privilege tables will ensure that all changes made so far
will take effect immediately.

ここで行った権限変更を即反映するか聞いています
Reload privilege tables now? [Y/n] Y
 ... Success!

Cleaning up...

All done!  If you've completed all of the above steps, your MariaDB
installation should now be secure.

Thanks for using MariaDB!
これで良いでしょう。
MariaDBの作業はまだありますが、手順では後になっています。
2.Zabbixインストール
Zabbixのパッケージリポジトリをこの OSに登録します。
[ec2-user@amazonlinux2 ~]$ sudo rpm -Uvh https://repo.zabbix.com/zabbix/5.0/rhel/7/x86_64/zabbix-release-5.0-1.el7.noarch.rpm
https://repo.zabbix.com/zabbix/5.0/rhel/7/x86_64/zabbix-release-5.0-1.el7.noarch.rpm を取得中
警告: /var/tmp/rpm-tmp.5r160u: ヘッダー V4 RSA/SHA512 Signature、鍵 ID a14fe591: NOKEY
準備しています...              ################################# [100%]
更新中 / インストール中...
   1:zabbix-release-5.0-1.el7         ################################# [100%]
登録できました。
CentOS 7でも RHEL 7でも同じリポジトリです。
yumのダウンロードキャッシュをクリアします。
[ec2-user@amazonlinux2 ~]$ sudo yum clean all
読み込んだプラグイン:langpacks, priorities, update-motd
リポジトリーを清掃しています: amzn2-core amzn2extra-docker zabbix zabbix-non-supported
Cleaning up everything
Maybe you want: rm -rf /var/cache/yum, to also free up space taken by orphaned data from disabled or removed repos
掃除できました。
MySQL(MariaDB)版の Zabbixサーバーと、自分自身(Amazon Linux 2)を監視するために、Zabbix Agentをインストールします。
[ec2-user@amazonlinux2 ~]$ sudo yum install -y zabbix-server-mysql zabbix-agent
読み込んだプラグイン:langpacks, priorities, update-motd
依存性の解決をしています
--> トランザクションの確認を実行しています。
---> パッケージ zabbix-agent.x86_64 0:5.0.36-1.el7 を インストール
---> パッケージ zabbix-server-mysql.x86_64 0:5.0.36-1.el7 を インストール

〜〜〜 途中省略 〜〜〜

インストール:
  zabbix-agent.x86_64 0:5.0.36-1.el7      zabbix-server-mysql.x86_64 0:5.0.36-1.el7

依存性関連をインストールしました:
  OpenIPMI-libs.x86_64 0:2.0.23-2.amzn2   OpenIPMI-modalias.x86_64 0:2.0.23-2.amzn2
  fping.x86_64 0:3.16-1.el7               net-snmp-libs.x86_64 1:5.7.2-49.amzn2.1
  unixODBC.x86_64 0:2.3.1-14.amzn2

完了しました!
これも問題なくインストールされました。
次の手順は、Zabbixのフロントエンドのインストールなんですが、手順にある
[centos-release-scl]パッケージが Amazon Linux 2のリポジトリにありません。
RHEL界では「ソフトウェアコレクション」って呼ばれているものみたいで、CentOSには CentOS Mirror にある [centos-release-scl-rh-2-3.el7.centos.noarch.rpm]パッケージをインストールすれば良いようです。
[centos-release-scl]パッケージの代わりにこれをインストールして、リポジトリの登録をします。
[ec2-user@amazonlinux2 ~]$ sudo yum install http://mirror.centos.org/altarch/7/extras/aarch64/Packages/centos-release-scl-rh-2-3.el7.centos.noarch.rpm
読み込んだプラグイン:langpacks, priorities, update-motd
centos-release-scl-rh-2-3.el7.centos.noarch.rpm                       |  12 kB  00:00:00

〜〜〜 途中省略 〜〜〜

インストール:
  centos-release-scl-rh.noarch 0:2-3.el7.centos

完了しました!
登録できたようです。
Amazon Linux 2に登録されたリポジトリの一覧を見てみます。
[ec2-user@amazonlinux2 ~]$ yum repolist all
読み込んだプラグイン:langpacks, priorities, update-motd
19 packages excluded due to repository priority protections
リポジトリー ID                            リポジトリー名                                            状態
amzn2-core/2/x86_64                        Amazon Linux 2 core repository                            有効:   31,368
amzn2-core-debuginfo/2/x86_64              Amazon Linux 2 core repository - debuginfo packages       無効
amzn2-core-source/2                        Amazon Linux 2 core repository - source packages          無効
amzn2extra-docker/2/x86_64                 Amazon Extras repo for docker                             有効:       88
amzn2extra-docker-debuginfo/2/x86_64       Amazon Extras debuginfo repo for docker                   無効
amzn2extra-docker-source/2                 Amazon Extras source repo for docker                      無効
centos-sclo-rh/x86_64                    CentOS-7 - SCLo rh                                      有効: 8,151+19
centos-sclo-rh-debuginfo/x86_64            CentOS-7 - SCLo rh Debuginfo                              無効
centos-sclo-rh-source                      CentOS-7 - SCLo rh Sources                                無効
centos-sclo-rh-testing/x86_64              CentOS-7 - SCLo rh Testing                                無効
zabbix/x86_64                              Zabbix Official Repository - x86_64                       有効:      409
zabbix-debuginfo/x86_64                    Zabbix Official Repository debuginfo - x86_64             無効
zabbix-frontend/x86_64                     Zabbix Official Repository frontend - x86_64              無効
zabbix-non-supported/x86_64                Zabbix Official Repository non-supported - x86_64         有効:        5
登録されて、[有効]にもなっていました。
ところで [zabbix-frontend/x86_64] というリポジトリが [無効] になっていますが(上の黄色のところ)、これを有効にするのが次の手順です。
[/etc/yum.repos.d/zabbix.repo]ファイルを vim等のエディタで以下のように編集します。
分かり難いですが緑の所が変更箇所です。
[zabbix-frontend]
name=Zabbix Official Repository frontend - $basearch
baseurl=http://repo.zabbix.com/zabbix/5.0/rhel/7/$basearch/frontend
enabled=0
gpgcheck=1
gpgkey=file:///etc/pki/rpm-gpg/RPM-GPG-KEY-ZABBIX-A14FE591

↓↓↓↓↓

[zabbix-frontend]
name=Zabbix Official Repository frontend - $basearch
baseurl=http://repo.zabbix.com/zabbix/5.0/rhel/7/$basearch/frontend
enabled=1
gpgcheck=1
gpgkey=file:///etc/pki/rpm-gpg/RPM-GPG-KEY-ZABBIX-A14FE591
編集ができたら、またリポジトリ一覧を見てみましょう。
上手くできていれば [zabbix-frontend/x86_64]リポジトリが [有効] になっているはずです。
Zabbixフロントエンド(要は NGINXと PHPか)をインストールします。
[ec2-user@amazonlinux2 ~]$ sudo yum install -y zabbix-web-mysql-scl zabbix-nginx-conf-scl
読み込んだプラグイン:langpacks, priorities, update-motd

〜〜〜 途中省略 〜〜〜

完了しました!
これも問題なくインストールできました。
MariaDBの中身を作ります。
MariaDBの [root]ユーザーでログインします。
パスワードは上でセキュアにした時に設定したものになります。
[ec2-user@amazonlinux2 ~]$ mysql -uroot -p
Enter password: [root]ユーザーの新パスワード
Welcome to the MariaDB monitor.  Commands end with ; or \g.
Your MariaDB connection id is 11
Server version: 5.5.68-MariaDB MariaDB Server

Copyright (c) 2000, 2018, Oracle, MariaDB Corporation Ab and others.

Type 'help;' or '\h' for help. Type '\c' to clear the current input statement.

MariaDB [(none)]>
MariaDBにログインできました。
手順の通り実行していきます。
[zabbix]データベースの枠を作ります
MariaDB [(none)]> create database zabbix character set utf8 collate utf8_bin;
Query OK, 1 row affected (0.00 sec)

[zabbix]ユーザーを作ります
MariaDB [(none)]> create user zabbix@localhost identified by 'password';  ← 本番ではパスワードを[password]にするのは止めましょう
Query OK, 0 rows affected (0.00 sec)

[zabbix]ユーザーに[zabbix]データベースの全権を付与します
MariaDB [(none)]> grant all privileges on zabbix.* to zabbix@localhost;
Query OK, 0 rows affected (0.00 sec)

一時的に一般ユーザー([zabbix]ユーザー)が関数やトリガを実行できるようにします
MariaDB [(none)]> set global log_bin_trust_function_creators = 1;
Query OK, 0 rows affected (0.00 sec)

一旦MariaDBからログアウトします
MariaDB [(none)]> quit;
Bye
[zabbix]データベースの枠ができましたので、テーブル等を作り込みます。
インストールしたパッケージに既にスクリプトが用意されているので、それを流し込みます。
[ec2-user@amazonlinux2 ~]$ zcat /usr/share/doc/zabbix-server-mysql*/create.sql.gz | mysql -uzabbix -p zabbix
Enter password: MariaDBの[zabbix]ユーザーのパスワード(この手順では[password]になっているはず)
何も出ませんが、ご安心下さい、履いています。
先程一時的に一般ユーザーに許可した権限をはずします。
再び MariaDBにログインします。
[ec2-user@amazonlinux2 ~]$ mysql -uroot -p
Enter password: [root]ユーザーの新パスワード

〜〜〜 省略 〜〜〜

MariaDB [(none)]> set global log_bin_trust_function_creators = 0;
Query OK, 0 rows affected (0.00 sec)

MariaDB [(none)]> quit;
Bye
Zabbixの設定ファイル [/etc/zabbix/zabbix_server.conf ] に、MariaDBの [zabbix]ユーザーのパスワードを設定します。
[/etc/zabbix/zabbix_server.conf]
### Option: DBPassword
#       Database password.
#       Comment this line if no password is used.
#
# Mandatory: no
# Default:
# DBPassword=

↓↓↓↓↓

### Option: DBPassword
#       Database password.
#       Comment this line if no password is used.
#
# Mandatory: no
# Default:
DBPassword=password
PHPの Zabbix用設定ファイル [/etc/opt/rh/rh-nginx116/nginx/conf.d/zabbix.conf] を編集します。
[/etc/opt/rh/rh-nginx116/nginx/conf.d/zabbix.conf]
# listen 80;
# server_name example.com;

↓↓↓↓↓

listen 80;
server_name amazonlinux2;  ← 私の環境ではこのようになります。
Zabbixは基本は Apache(httpd)でフロントをやるようですが、私は NGINXを選択したので、次の設定が必要になります。
PHPの常駐プロセスは OSの [apache]ユーザーで動いていますが、これに [nginx]ユーザーでのアクセスを許可する…んでしょう。
(PHPは良く分からん…)
PHPの常駐プロセス(php-fpm)の設定ファイル
[/etc/opt/rh/rh-php72/php-fpm.d/zabbix.conf]を編集します。
2箇所あって、1つが [nginx]ユーザーの件、もう1つがタイムゾーンの設定です。
[/etc/opt/rh/rh-php72/php-fpm.d/zabbix.conf]
1箇所目
listen.acl_users = apache
↓↓↓↓↓
listen.acl_users = apache,nginx

2箇所目
; php_value[date.timezone] = Europe/Riga
↓↓↓↓↓
php_value[date.timezone] = Asia/Tokyo  ← コメントアウト[;]を消すのを忘れずに
これで設定は終わりです。
Zabbixが OS起動時に自動起動するように設定した後、その設定を使って起動します。
[ec2-user@amazonlinux2 ~]$ sudo systemctl enable zabbix-server zabbix-agent rh-nginx116-nginx rh-php72-php-fpm
Created symlink from /etc/systemd/system/multi-user.target.wants/zabbix-server.service to /usr/lib/systemd/system/zabbix-server.service.
Created symlink from /etc/systemd/system/multi-user.target.wants/zabbix-agent.service to /usr/lib/systemd/system/zabbix-agent.service.
Created symlink from /etc/systemd/system/multi-user.target.wants/rh-nginx116-nginx.service to /usr/lib/systemd/system/rh-nginx116-nginx.service.
Created symlink from /etc/systemd/system/multi-user.target.wants/rh-php72-php-fpm.service to /usr/lib/systemd/system/rh-php72-php-fpm.service.

[ec2-user@amazonlinux2 ~]$ sudo systemctl start zabbix-server zabbix-agent rh-nginx116-nginx rh-php72-php-fpm
起動しました。
3.Zabbix初期設定
WEBブラウザでアクセスします。
私の環境だと [http://amazonlinux2] になります。
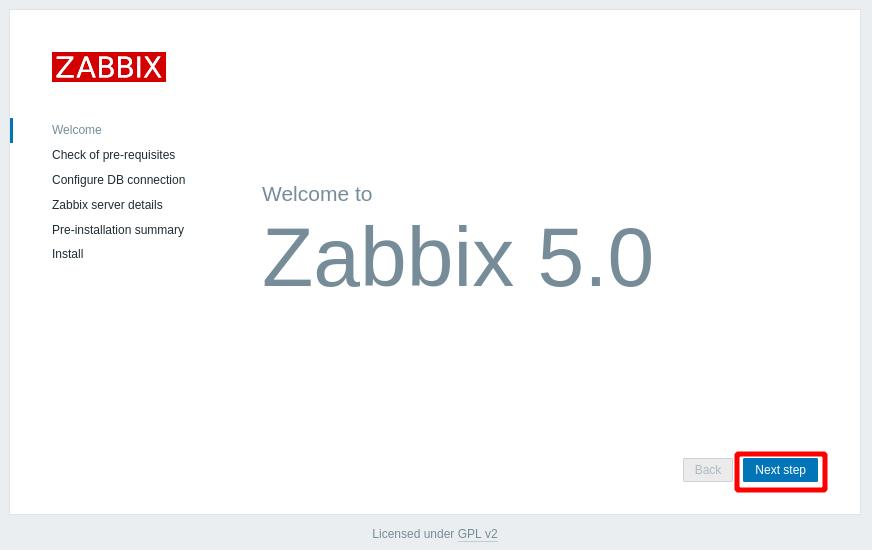
Next stepを押します。
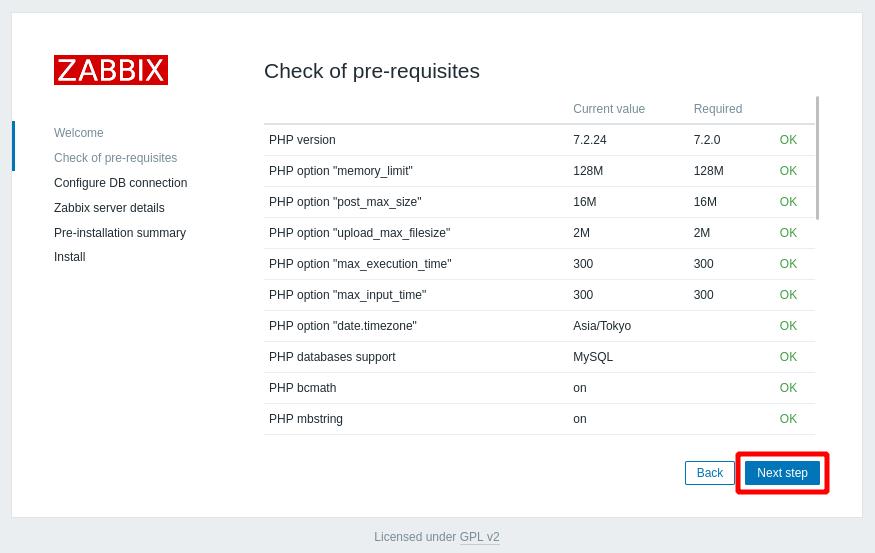
スライドバーをスライドさせると、全て [OK] になっていると思います。
Next stepを押します。
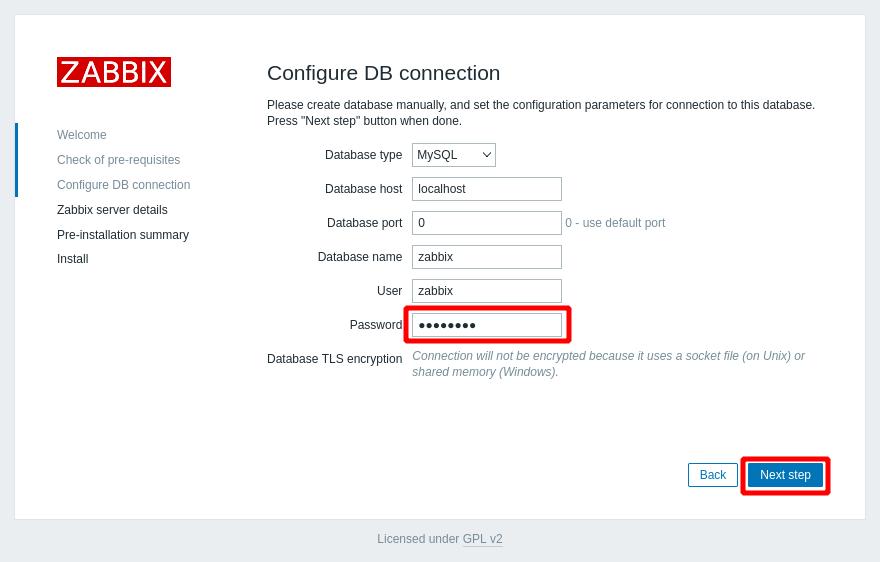
MaariaDBの [zabbix]ユーザーのパスワード(ここの手順では [password] になっているはず)を設定します。
Next stepを押します。
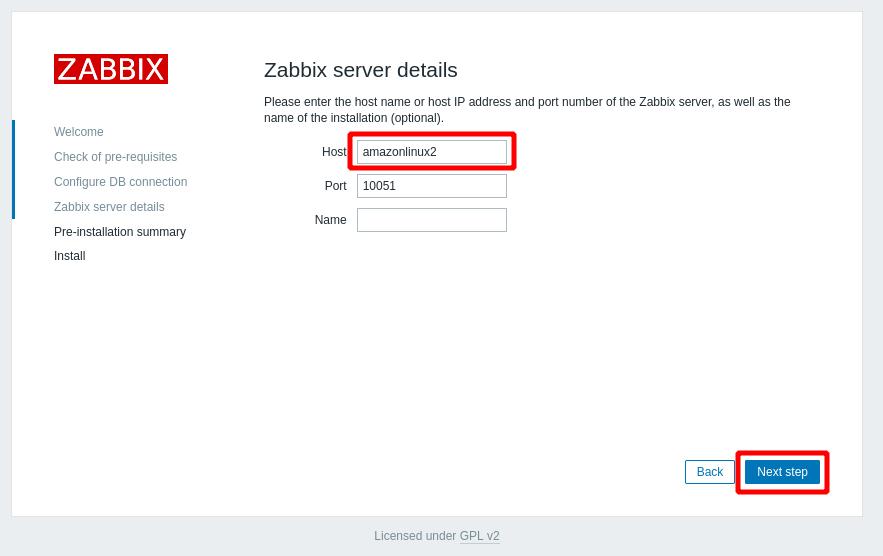
Zabbixをサーバーのどの IPで提供するかの設定だと思います。
デフォルトの [localhost] にしておいても [0.0.0.0] を使うと思いますが、一応マシン名を入れておきました。
Next stepを押します。
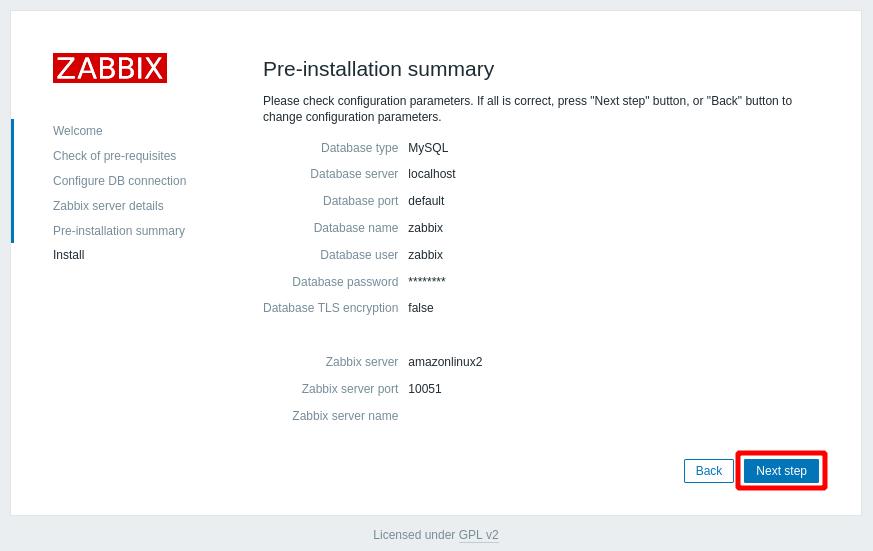
設定のサマリです。
Next stepを押します。
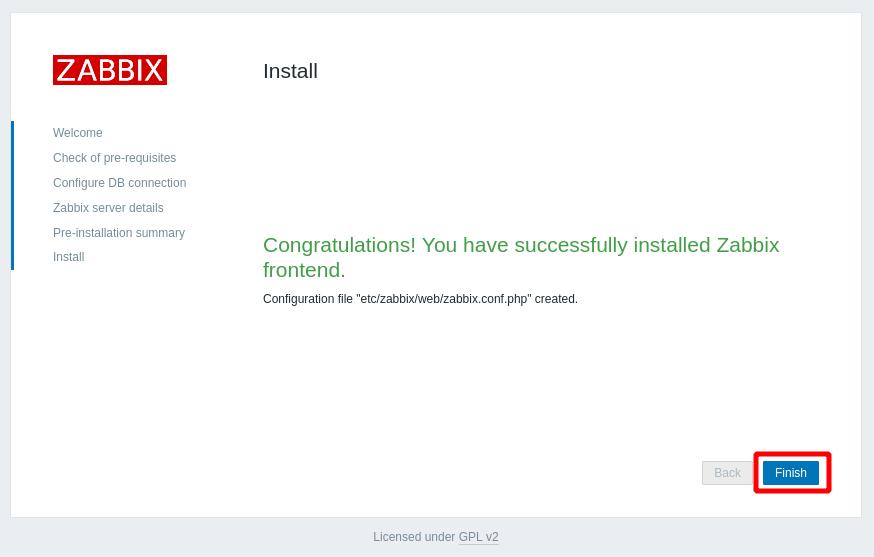
Finishを押します。
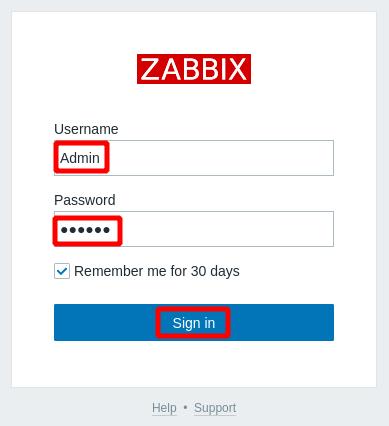
初期ログインです。
アカウント / パスワードは [Admin / zabbix] です。
Sign inを押します。
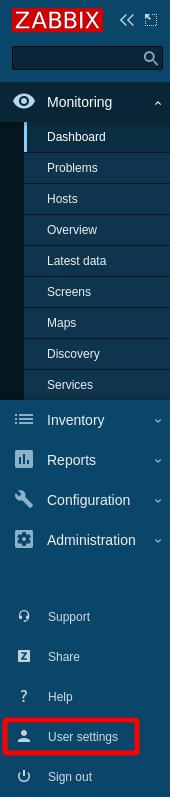
ダッシュボードが表示されて感動しますが、間髪入れずに日本語にします。
左のメニューの [User settings] をクリックします。
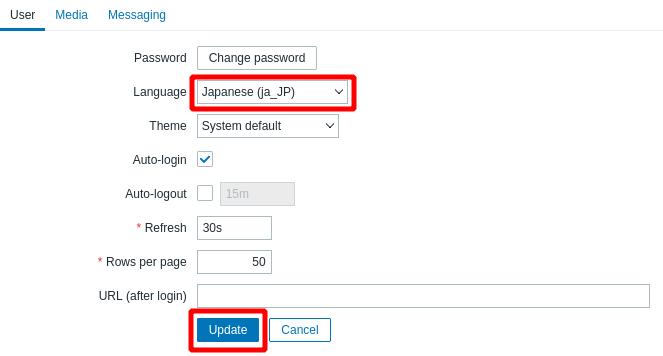
[Language] に [Japanese] を選択し、Updateを押します。
日本語になりました。
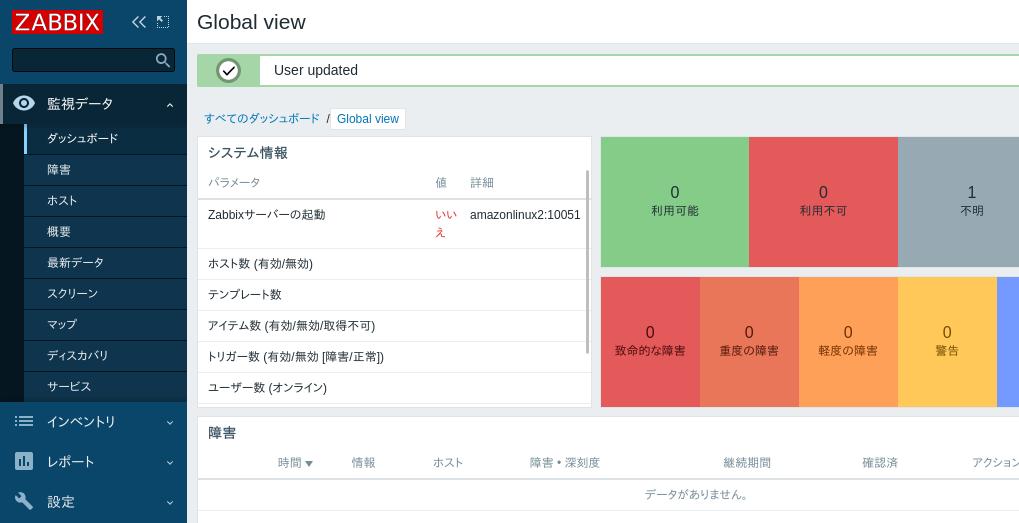
初期設定は以上になります。
4.監視対象に Zabbix Agent 2をインストール
「Windows Server 2022 インストール」と全く同じ要領で、Windows Serverを 3つ用意しました。
(私はそれぞれの体験版のメディアを持っています)
IPアドレスはそれぞれこうなっています。
| Amazon Linux 2 (Zabbixサーバー) | 192.168.1.113 |
| Windows Server 2012R2 | 192.168.1.117 |
| Windows Server 2016 | 192.168.1.118 |
| Windows Server 2019 | 192.168.1.119 |
監視対象の Windows Serverに Zabbix Agent 2をインストールします。
Zabbix Agentをインストールしなくても SNMPで監視ができなくもないのですが、Zabbix Agentの方がきめ細かい監視が行えますので、可能なら Agentをインストールするのが良いでしょう。
エージェントの [無印] と [2]では後者の方が機能が強いです。
Ver.6.2のですが、日本語の¥比較表がありました。
Agent と agent 2 の比較
こちらからダウンロードします。
Download and install Zabbix
ここで、Windowsのインストーラ形式(msi)を選択します。
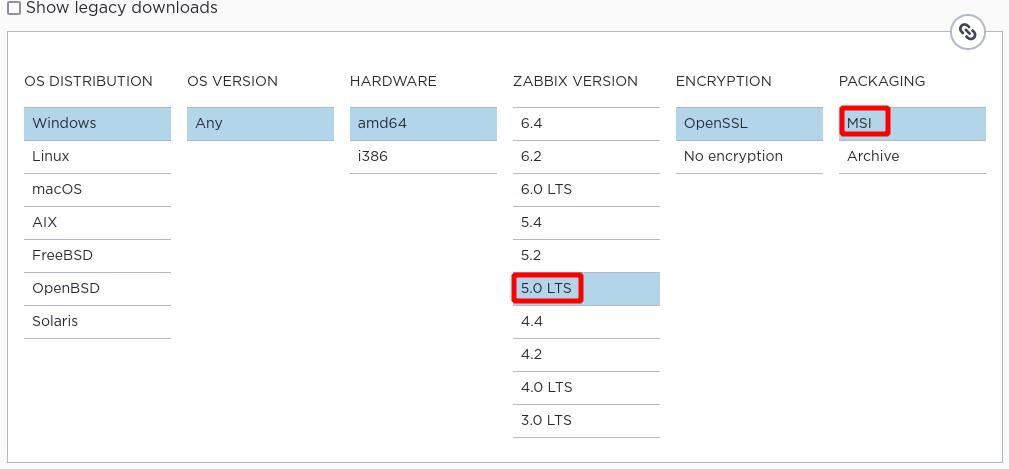
[Zabbix Agent 2]の方をダウンロードします。
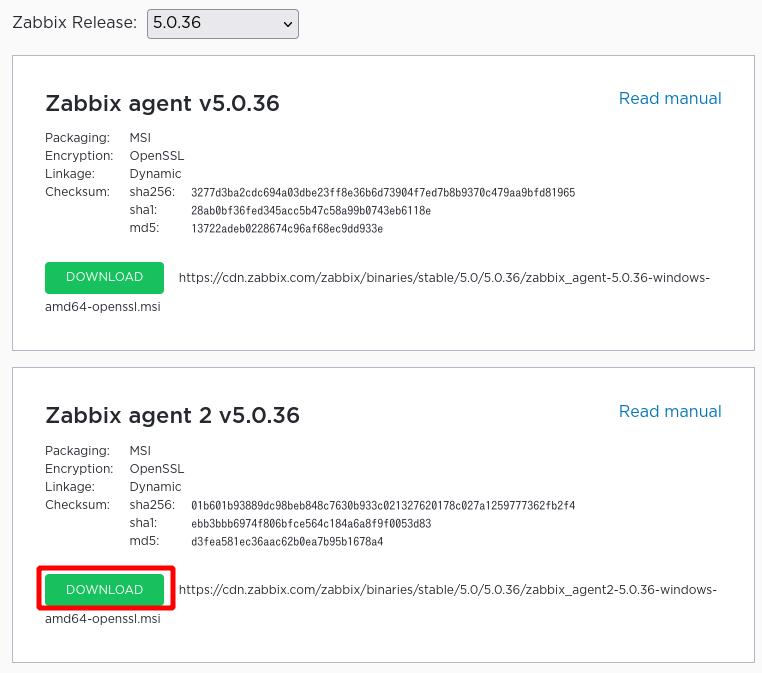
ダウンロードしたファイルがこちらです。
![]()
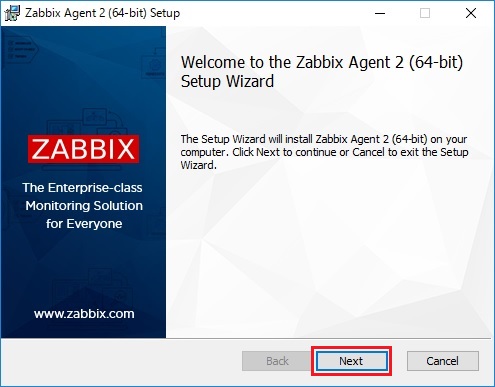
3つの Windows Serverそれぞれで同じことをします。
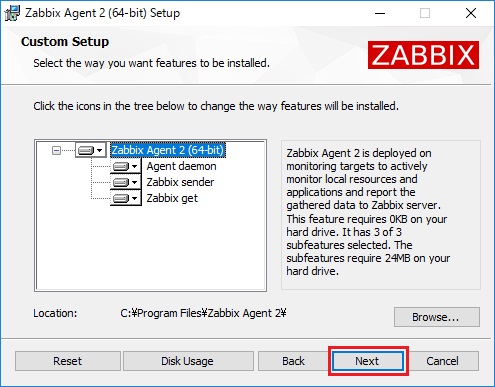
ダウンロードしたファイルをダブルクリックして実行します。
Nextを押します。
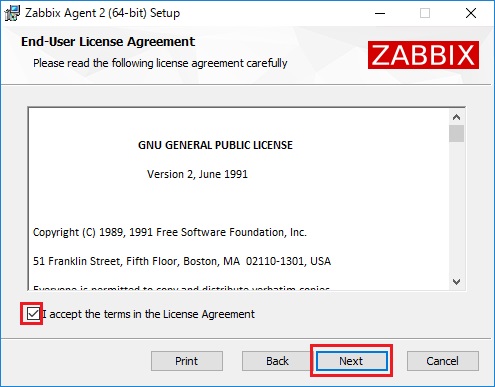
[I accept the terms in the License Agreement] にチェックし、Nextを押します。
Nextを押します。
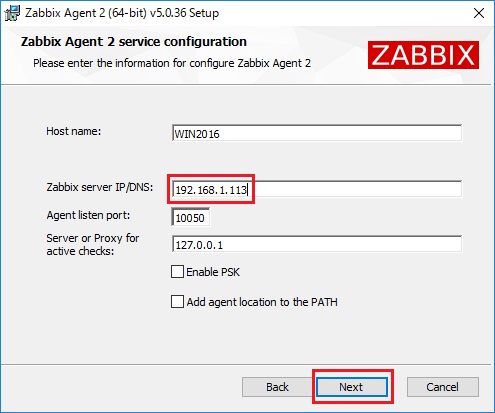
[Zabbix Server IP/DNS] に Zabbix Server(Amazon Linux 2)の IPアドレスを入力し、Nextを押します。
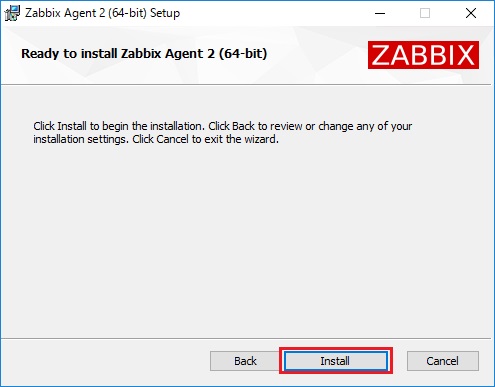
Installを押します。
Finishを押します。
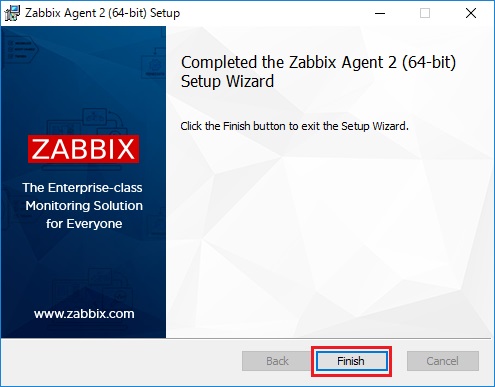
これで監視対象の Windwos Server側は OKです。
Windows Defender Firewallでの穴開け、Windowsサービスでの自動起動も設定されています。
5.監視対象の登録
個々の監視対象を設定していきます。
監視できる項目は結構細かいのですが、これを一々設定しているのでは手間かかるので、Zabbixでは監視項目をある程度纏めた「テンプレート」で設定するのが普通です。
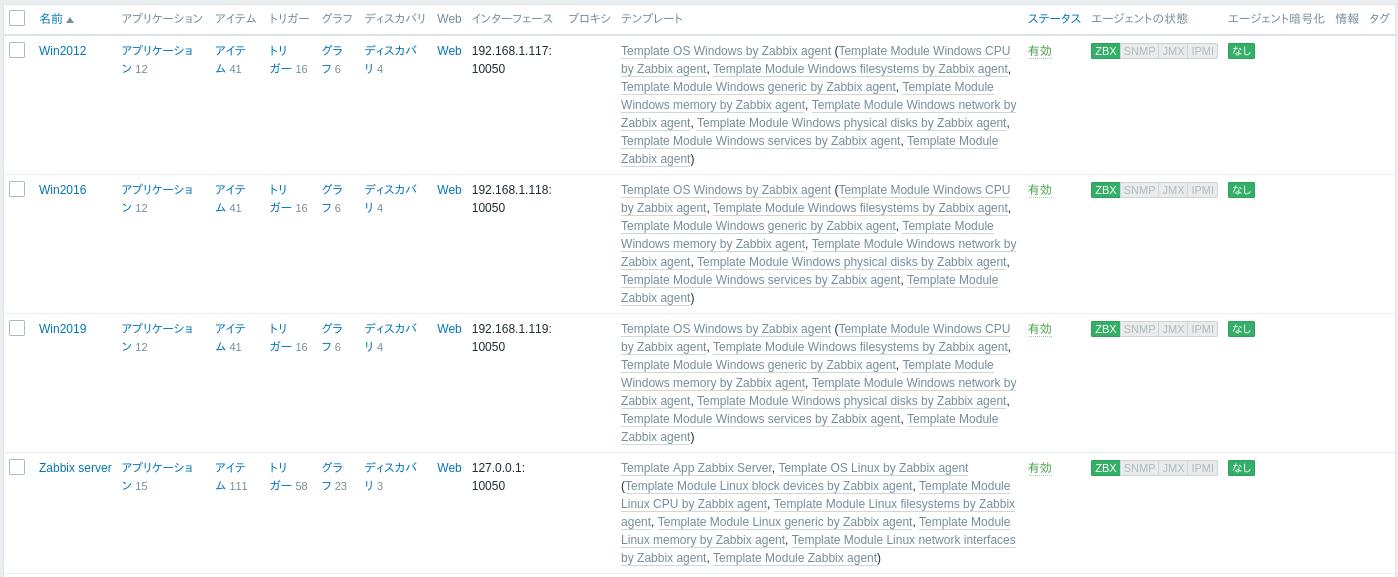
テンプレートを自分で作ることができますが、例えばこれから Windows Serverの監視をするにあたっては、デフォルトで入っている [Template OS Windows by Zabbix agent]テンプレートが良いかと思います。
個々の Windows Serverを登録するのは「ホスト」とというものなんですが、「ホスト」は「ホストグループ」という枠に入る必要があります。
ですので先に [Windows Servers]ホストグループを作成します。
(名前は勝手につけました)
Zabbixの左のメニューで、[設定] → [ホストグループ] を選択します。

私が Zabbixで嫌いなところはこの判り難さ…。
画面右上のホストグループの作成を押します。

[グループ名] を設定し、追加を押します。

[ホスト]を登録します。
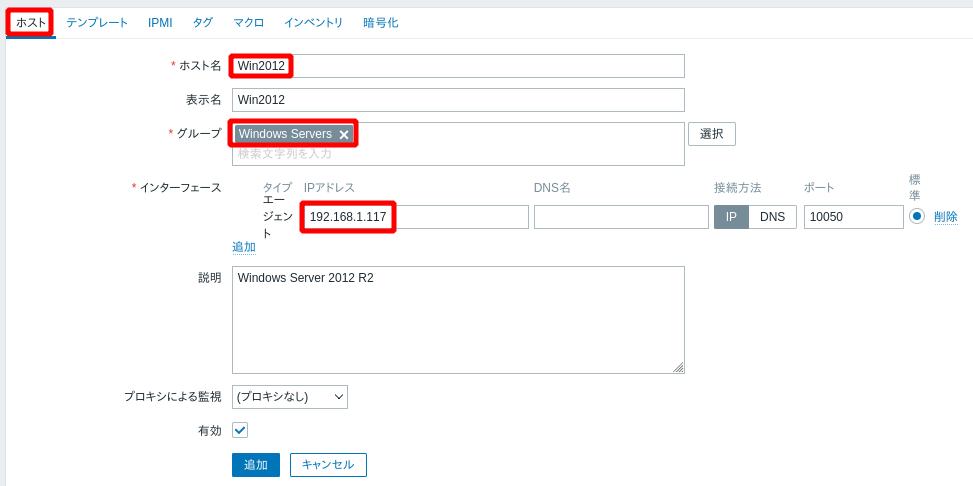
以降は Windows Server 2012 R2のサーバーを例にしています。
Zabbixの左のメニューで、[設定] → [ホスト] を選択します。

画面右上のホストの作成を押します。
[ホスト]タブです。
必須項目だけ赤枠にしています。
所属するホストグループと監視対象の Windows Serverの IPアドレスを設定してやります。
まだ追加は押さないで下さい。
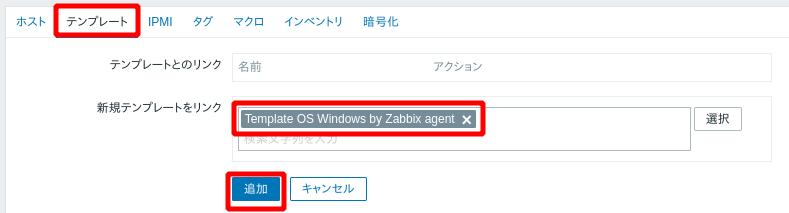
[テンプレート]タブです。
適用するテンプレートを設定します。
上で書いた通り [Template OS Windows by Zabbix agent]テンプレートにしました。
追加を押します。
[ホスト]の画面ではこんな風に出ました。
赤枠の [ZBX]が緑色になっていれば Zabbix Agentと通信できている状態になっているのですが、ホスト登録後に緑色になるまで少し時間がかかります。
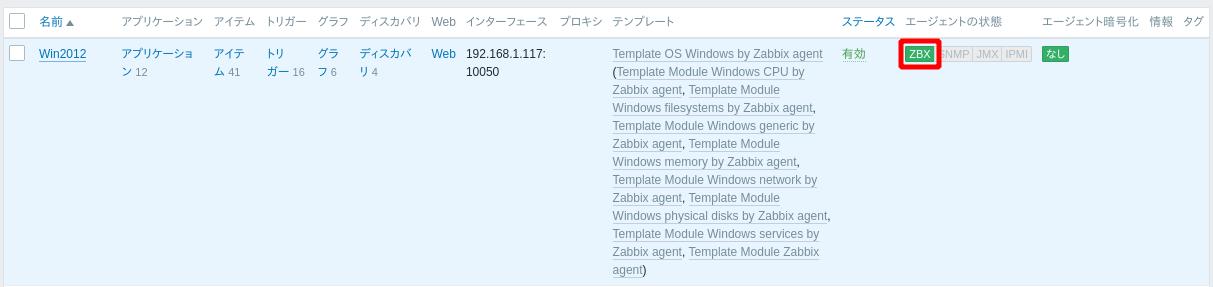
これで横スライドバーにならないギリギリの横幅で、この融通の利かない画面デザインも Zabbixの残念なところです。
残りの 2つも登録した結果、[ホスト]画面ではこうなりました。
6.サーバー負荷のグラフを見る
ここまで来ると、デフォルト設定のままで結構色々と見ることができます。
例として CPUの負荷グラフを見てみます。
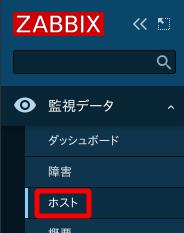
Zabbixの左のメニューで、[監視データ] → [ホスト] を選択します。
[Win2012] の行の [グラフ] をクリックします。

[Template OS Windows by Zabbix agent]テンプレートだとグラフは 6つありましたが、その中の [CPU Usage]グラフです。
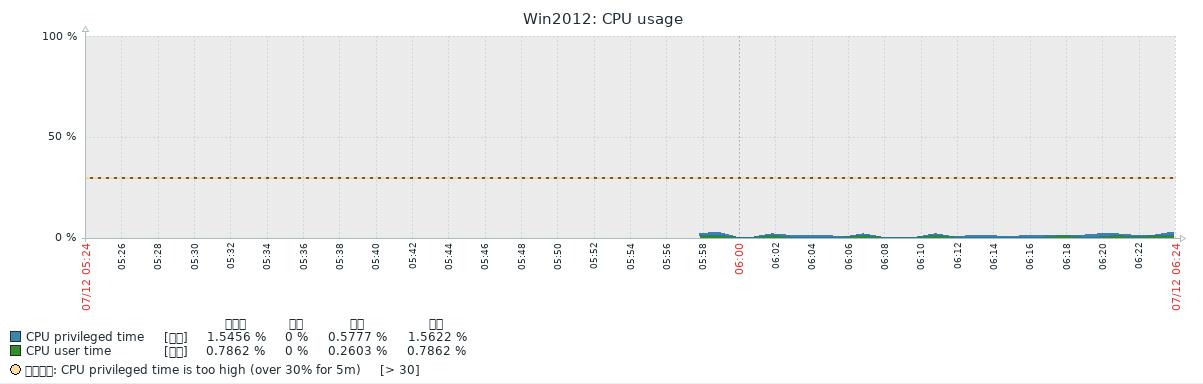
所々文字化けして豆腐になっていますね。
これは解消可能のようなんですが、そのうちということで。
これにてこのネタは終了です。
以前「Zabbixインストール(前編)」と「Zabbixインストール(後編)」で Ver.6.2を扱っていますが、今回 5.0LTSを使ってみて、「新しい方は『ここが使えね〜』というあたりが細かく改善されているな」と思いました。
やはり世界中のユーザーが「使えね〜」と思っていたところがあったんでしょう。
また、今回はエージェントとの通信にオーソドックスな「パッシブモード」を使いましたが、Windows Serverのイベントログを拾いたい場合は「アクティブモード」が必要でした。
近い内に、アクティブモードでの監視対象のログ収集と、収集してきたサーバーメトリクスから通知への連携も試してみたいと思います。
 | [改訂3版]Zabbix統合監視実践入門──障害通知、傾向分析、可視化による省力運用 [ 寺島 広大 ] 価格:4,048円 |
 | Zabbix統合監視徹底活用改訂2版 複雑化・大規模化するインフラの一元管理 (Software Design plusシリーズ) [ 池田大輔 ] 価格:3,960円 |